
This guide will help Authorized Retailers manage their OCS account, browse the OCS item catalogue, place their weekly orders and access important information, such as account balances, delivery information and order documentation.
Last Updated: July 24, 2026
DISCLAIMER: All information contained in the OCS B2B Portal Guide is strictly confidential and is intended solely for OCS clients with an assigned password and is intended for general guidance and informational purposes only. The information in this guide is updated often and is non-binding, non-exhaustive, and subject to change. No party shall be permitted to modify, publish, transmit, participate in the transfer or sale, create derivative works, or in any way exploit or use any of the information contained herein, in whole or in part, without the prior written consent of the OCS.
Setting Up Your B2B Portal Retailer Account
Learn how to set up your OCS B2B Portal Retailer Account once you’ve received your registration email.
Please ensure you have all the required documentation and store details ready before you begin the registration process.
Log in to the OCS B2B Portal
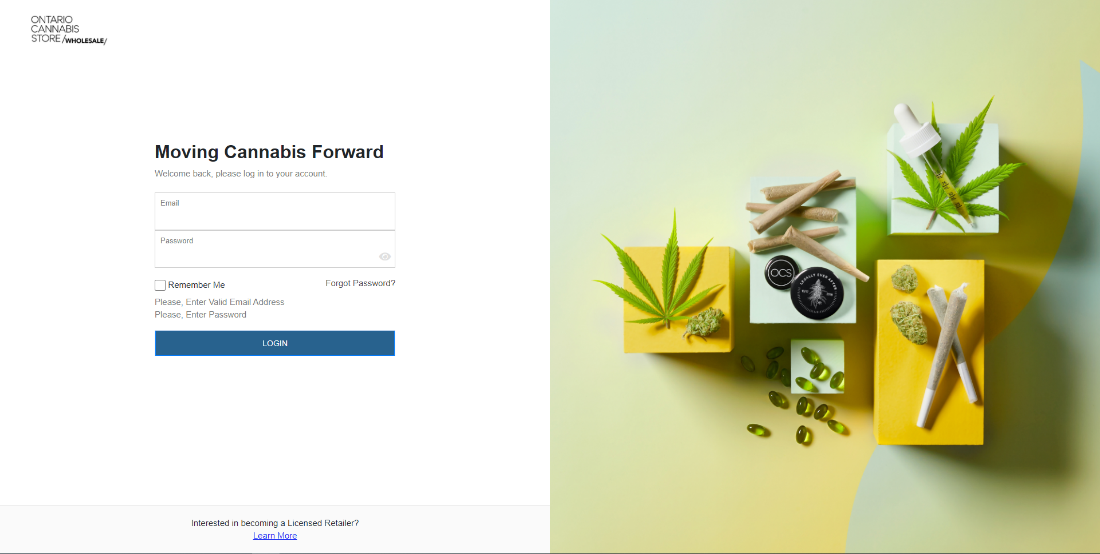
You must complete the steps below to begin the account registration process.
- You will receive an email from the OCS. Click the Start Registration link within the email to initiate the account creation process.
- On the OCS B2B Portal login page, enter the email address your registration invitation was sent to. Create a new password, and then you may log in. If you would like to register with a different email address, please contact our Customer Care team by calling 1-877-627-1627 or texting us at 647-361-1587, or click here for more ways to connect.
Create an OCS Retailer Account
Once you’ve completed the OCS Non-Disclosure Agreement, follow these steps to complete your OCS B2B Portal Retailer Account registration.
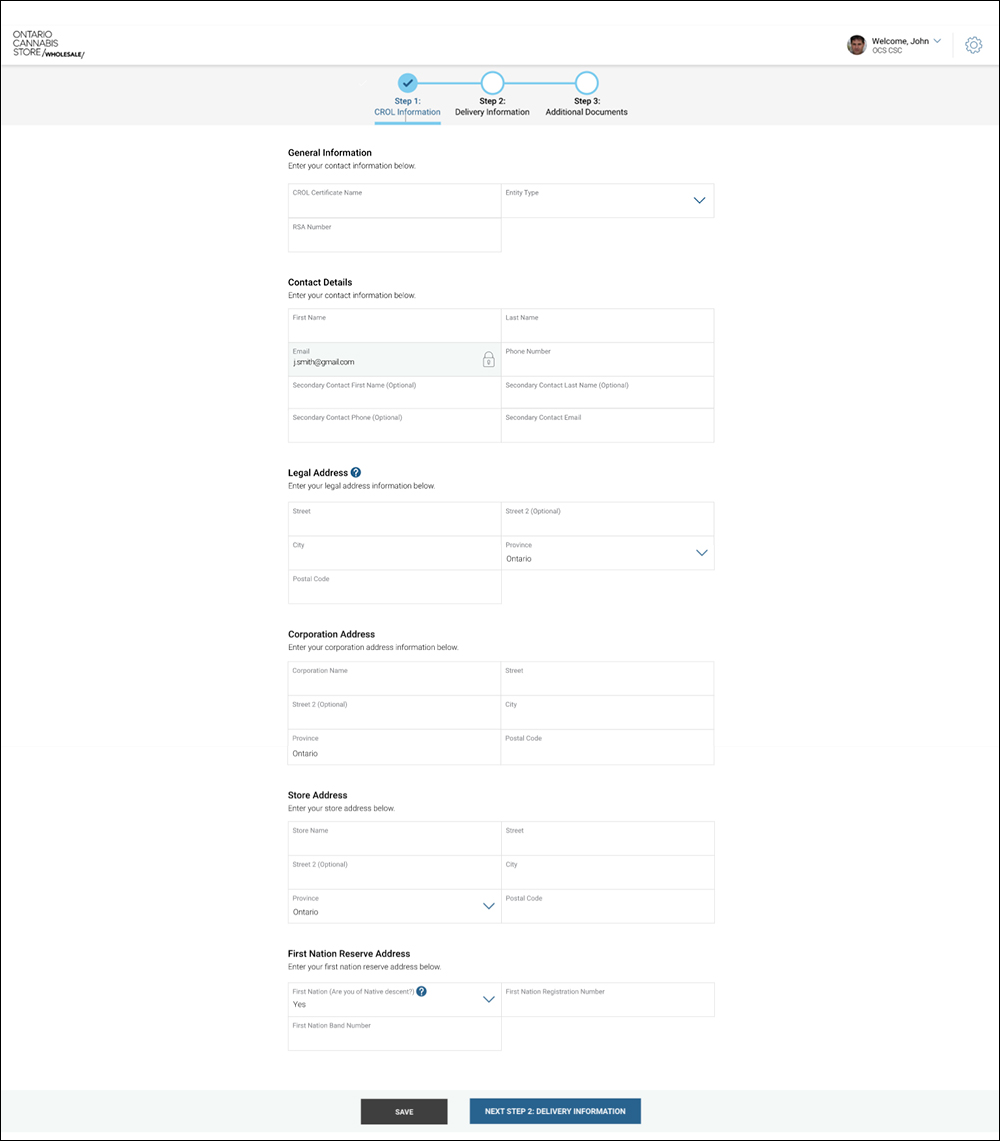
- Enter the Certificate Name issued to your Cannabis Retail Operator Licence (CROL) number. This information must match the certificate issued by the Alcohol and Gaming Commission of Ontario (AGCO).
- Enter your business entity type. This must match the business entity type on your AGCO-issued documentation.
- Enter your Cannabis Retail Store Authorization (CRSA) number, as provided by the AGCO.
- Fill in your contact details, including your name, email and phone number. You may also enter a secondary contact name, email and phone number.
- If you selected “Corporation” as your entity type, enter your complete corporation address.
- Your complete store name and address must match your AGCO-issued CRSA Certificate.
- Indicate whether you are a First Nation Licensed Retail Operator and if so, enter your First Nation Registration and Band numbers.
You must save your progress to move on to the next step.
Set Up Your Delivery Information
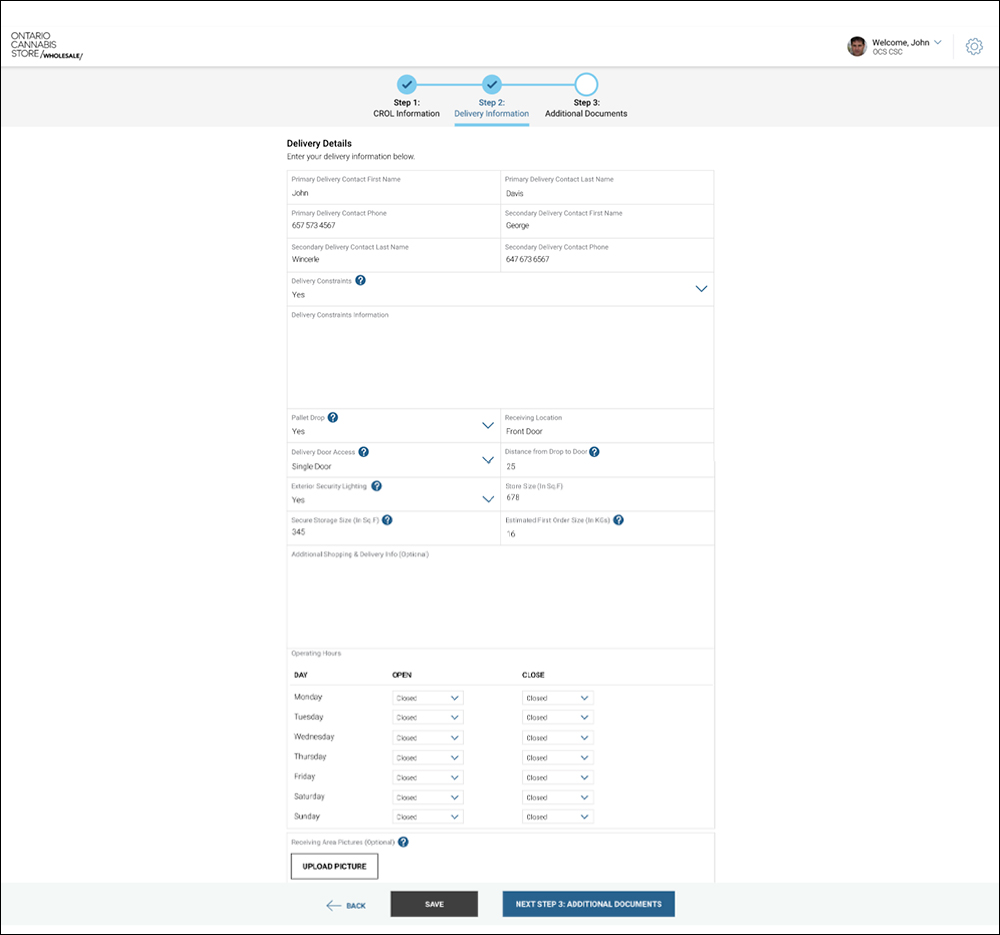
For accurate delivery information, please fill in these details about your store.
- Primary and Secondary Delivery Contact Information – Our delivery partners may get in touch with your contacts on the day of your scheduled delivery.
- Delivery Constraints – Enter any constraints that could impact how an order is delivered to your store. This could include parking bylaws or directions regarding where to park for delivery.
- Receiving Location – Select the location where your order should be delivered (back door or front door).
- Delivery Door Access – Let us know whether you have a single or double door.
- Distance from Drop to Door – Indicate the distance (in feet) between the order drop location and the delivery door.
- Exterior Security Lighting – Let us know if there is exterior security lighting.
- Store Size – Provide the store size in square feet.
- Secure Storage Size – Provide the store’s secure storage size in square feet.
- Estimated First Order – Indicate the estimated weight (in kilograms) of your first store order.
- Additional Shipping & Delivery Info (optional) – Provide any additional information the OCS’s delivery partners should be aware of when making deliveries to your store.
- Operating Hours – Indicate your store’s operating hours by day of the week.
- Receiving Area Pictures (optional) – Upload photos of your receiving area to assist the OCS’s delivery partners. This can include photos of the door or instructions regarding where to park.
You must save your progress to move on to the next step.
Upload documents
- Upload the following required documents to set up your Retailer account.
-
- Store Pre-Authorized Debit (PAD) Form: This is attached to the registration email you received.
- Void Cheque or Stamped Direct Deposit Form: This allows us to validate your banking information.
- Store Certificate of Insurance
- AGCO CRSA Licence
- AGCO CROL Licence
- Store Logo: Please upload a .png image (250 px wide; 72 ppi).
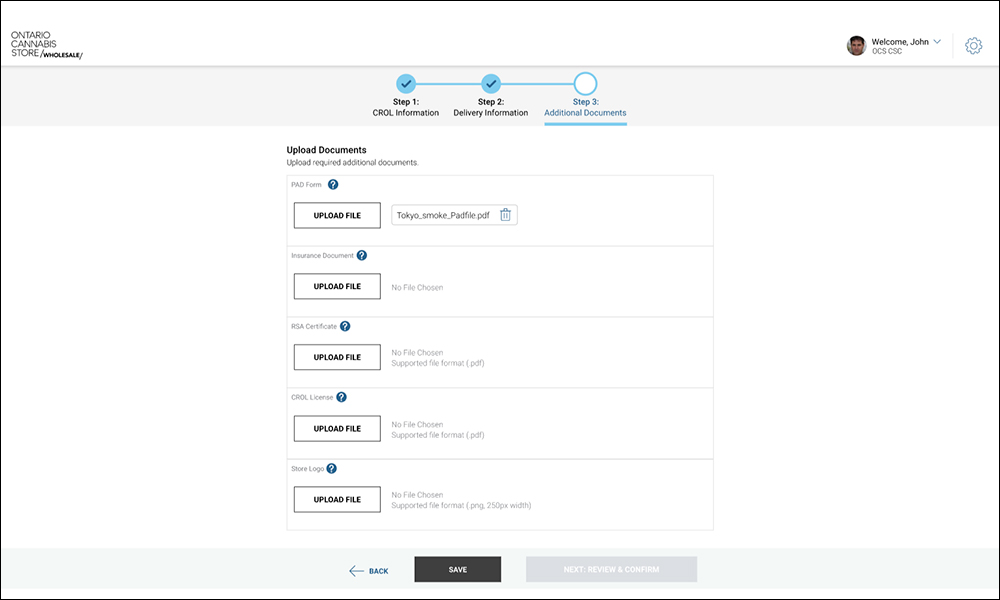
2. Once you have submitted your documents, an OCS Onboarding Specialist will review your submission. If there are any errors in your submission, you will receive an email notification outlining the missing or incorrect information. Follow the link provided in the email to read more about the updates required for your submission. You will need to resubmit your application with the correct information before we can approve your account.
Navigating the OCS B2B Portal
Use your login credentials to access the OCS B2B Portal. (Beginning September 2026)
Step 1: Access the OCS B2B Portal
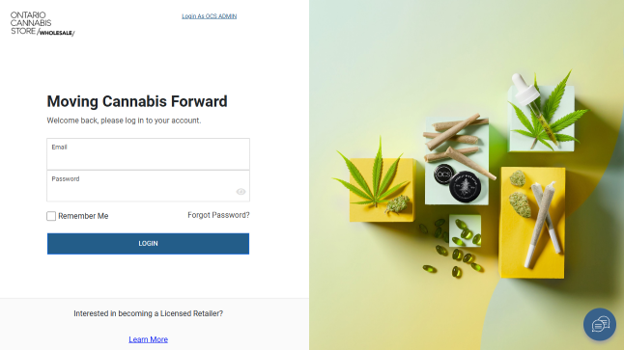
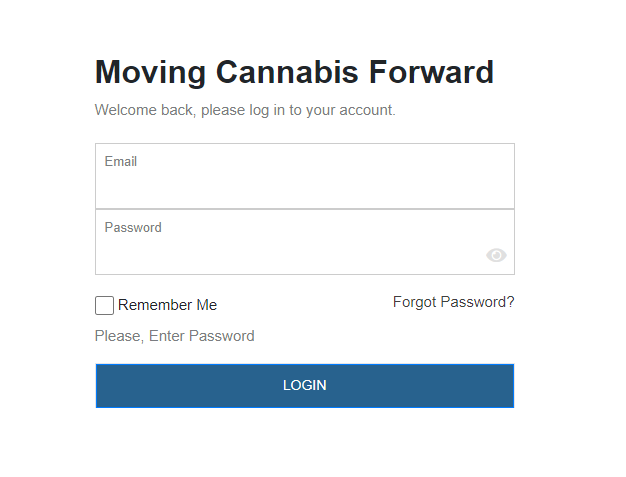
Open a web browser and navigate to the OCS B2B Portal. The login page will appear.
Step 2: Sign in to the B2B Portal
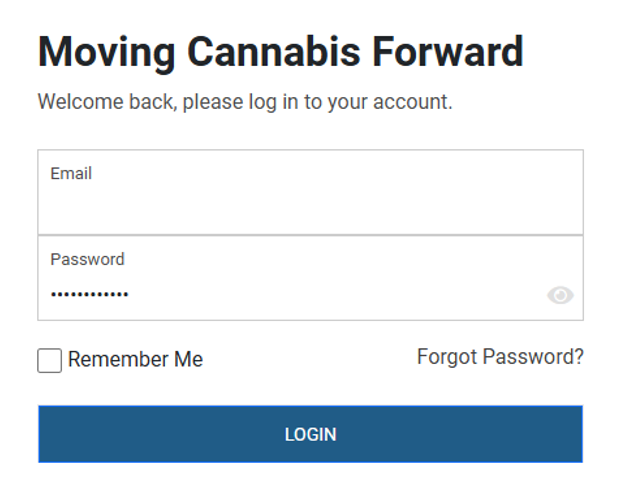
Enter your email address and password in the login fields located in the centre of the page. Select Login.
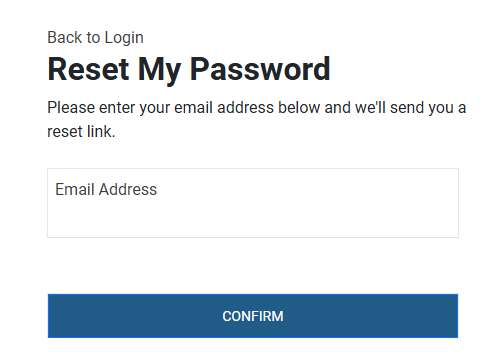
If you have forgotten your password, select Forgot Password?. Enter your registered email address and follow the instructions sent to your inbox to reset your password.
Step 3: Set up MFA
After signing in for the first time, you will be prompted to set up MFA. Enter the phone number you would like to use for MFA verification and select Continue.
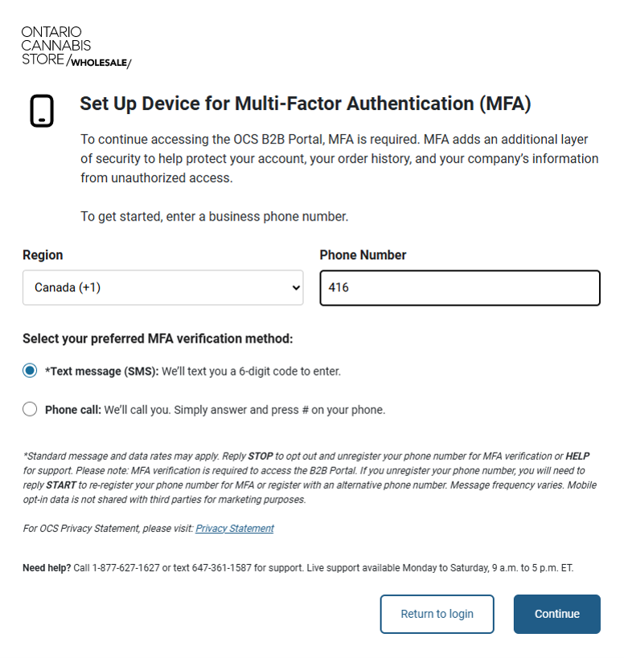
A verification code will be sent by text message to the phone number you entered. Enter the verification code and select Continue.
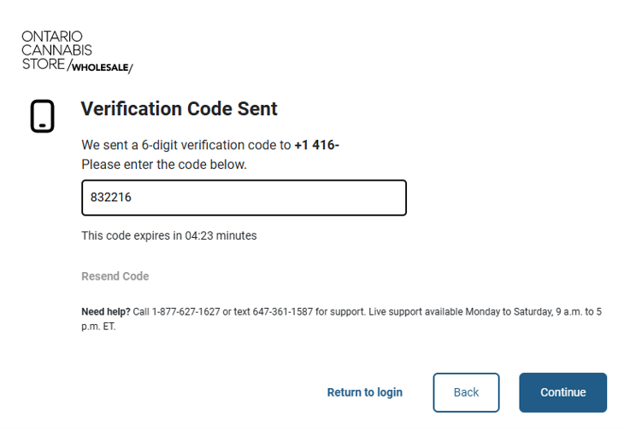
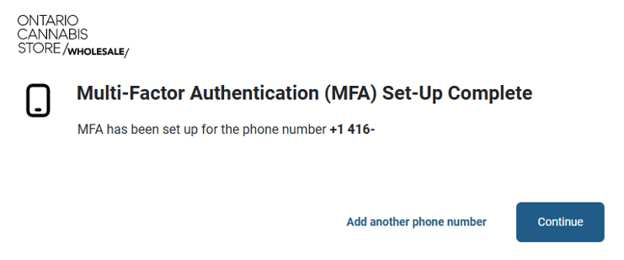
Once verification is successful, a confirmation screen will appear.
You may choose to register an additional phone number as a backup authentication method. If you do not wish to add another phone number, select Continue.
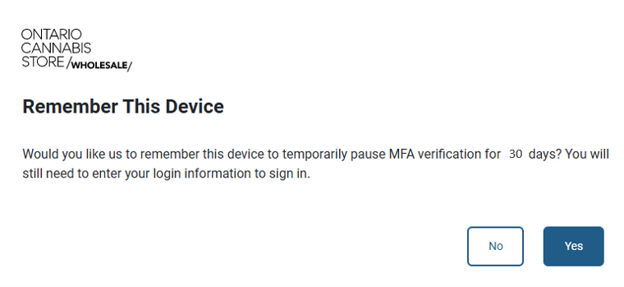
Step 4: Choose MFA verification frequency
Choose whether you would like MFA verification to occur each time you sign in or less frequently on the device you are currently using.
- Yes – MFA verification will be required less frequently.
- No – MFA verification will be required each time you sign in.
Once MFA setup is complete, the Welcome screen will appear.
- Select the store you wish to access and click Select. You will then be directed to the B2B Portal home page.
- Based on your selected preferences for MFA verification frequency, the following MFA prompt may appear.
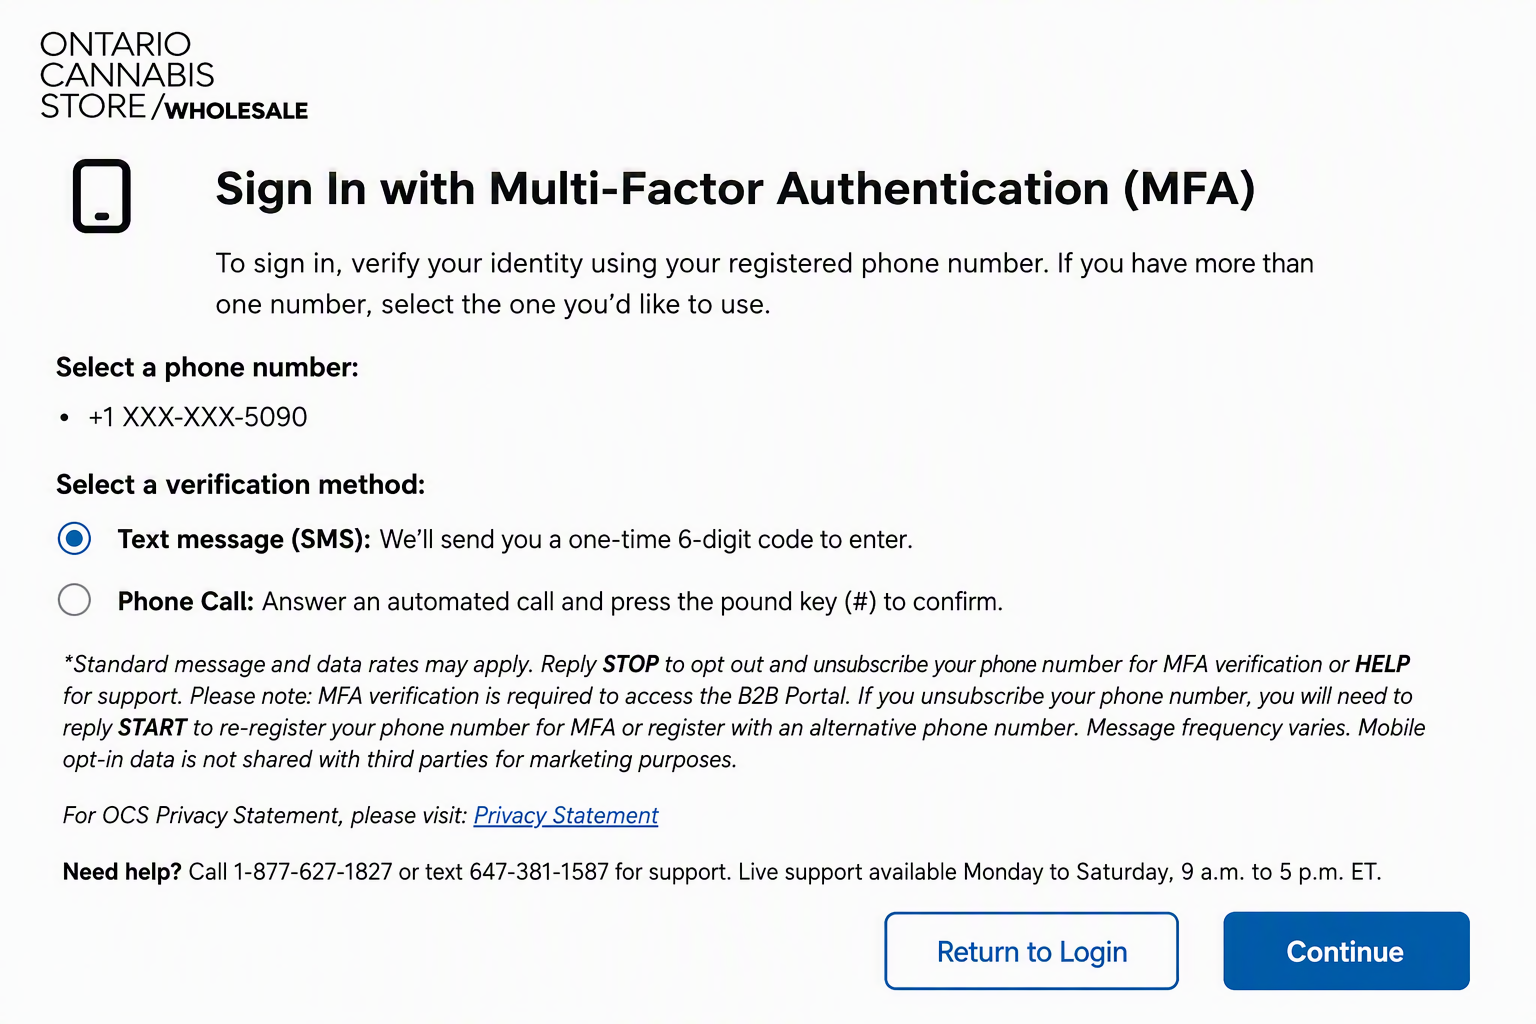
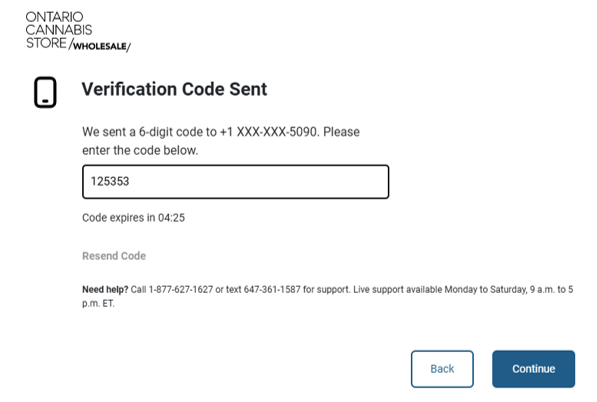
Option 1: SMS Verification
Select Continue to receive a verification code by text message.
Enter the verification code received on your phone and select Continue. You will then be directed to the home page.
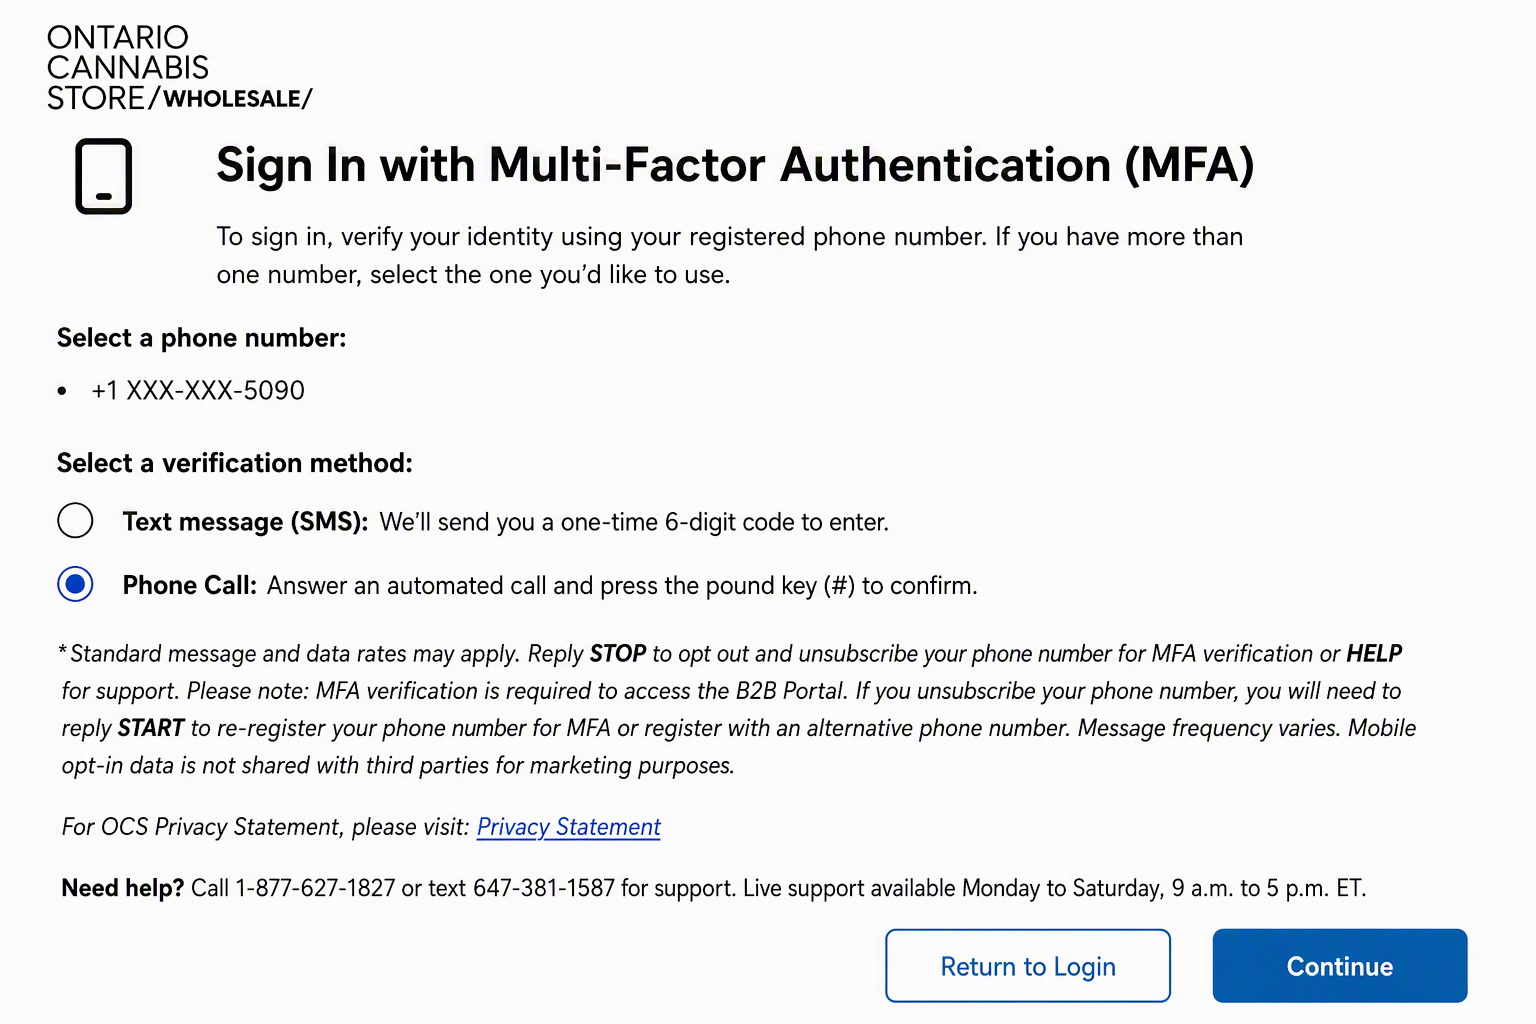
Option 2: Phone Call Verification
You may choose to receive a phone call instead of a text message.
Select Continue. You will receive an automated phone call and be prompted to press the # key to verify your identity.
Once verification is complete, you will be directed to the home page.
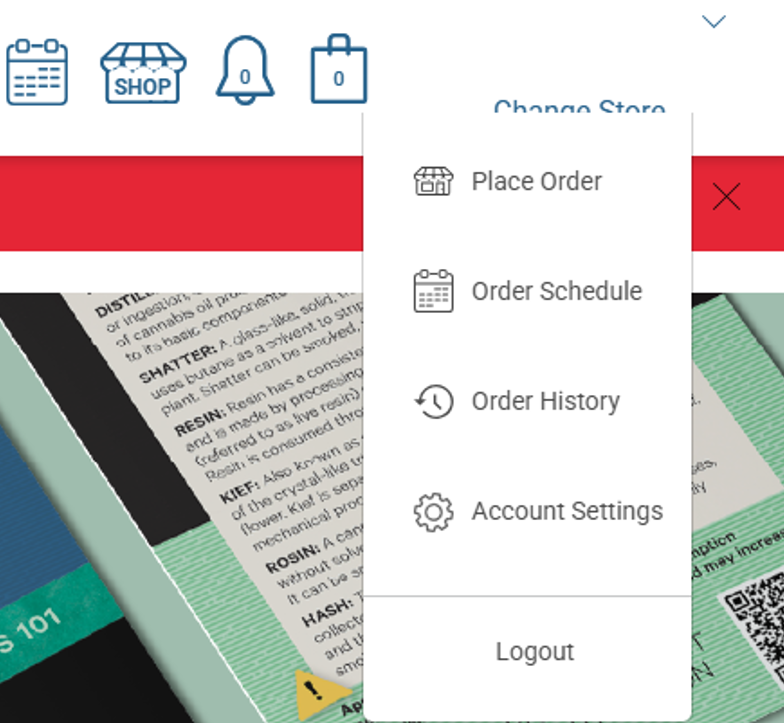
- Select the account icon in the upper-right corner of the screen.
2. Select Account Settings from the drop-down menu.
3. Select the Multifactor Authentication Management
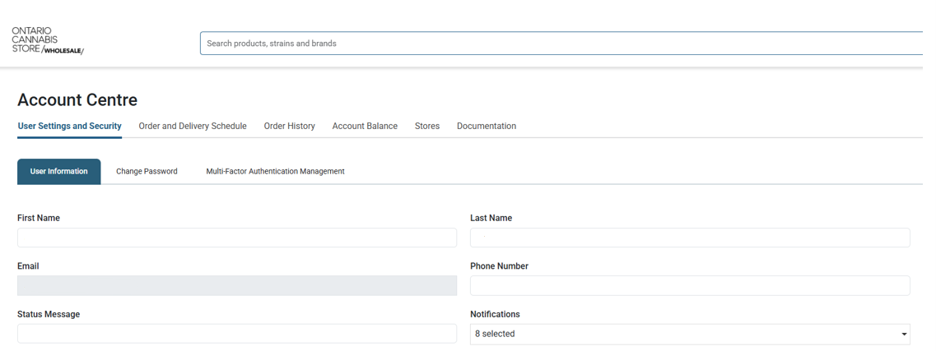
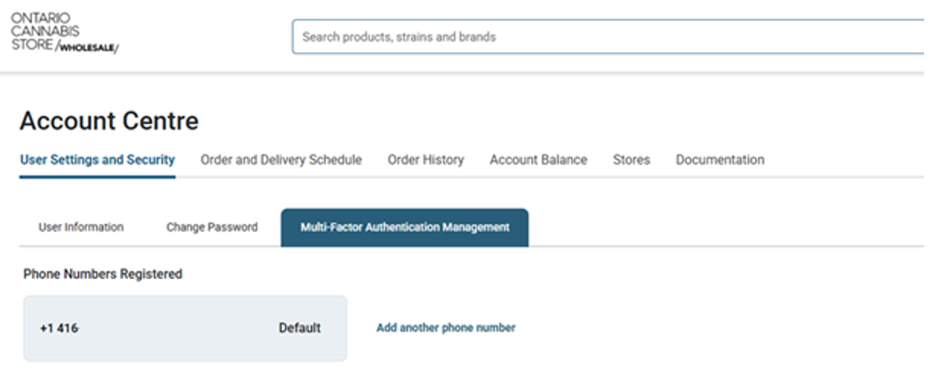
4. From this page, you can:
-
- Add an additional phone number for MFA
- Manage existing MFA phone numbers
- Update MFA preferences
5. To add another phone number, select Add another phone number and follow the MFA enrollment process.
Users with User Management permissions can reset MFA for other users within their organization.
Step 1: Open User Management
Select User Management from the account menu. A list of users within your organization will be displayed.
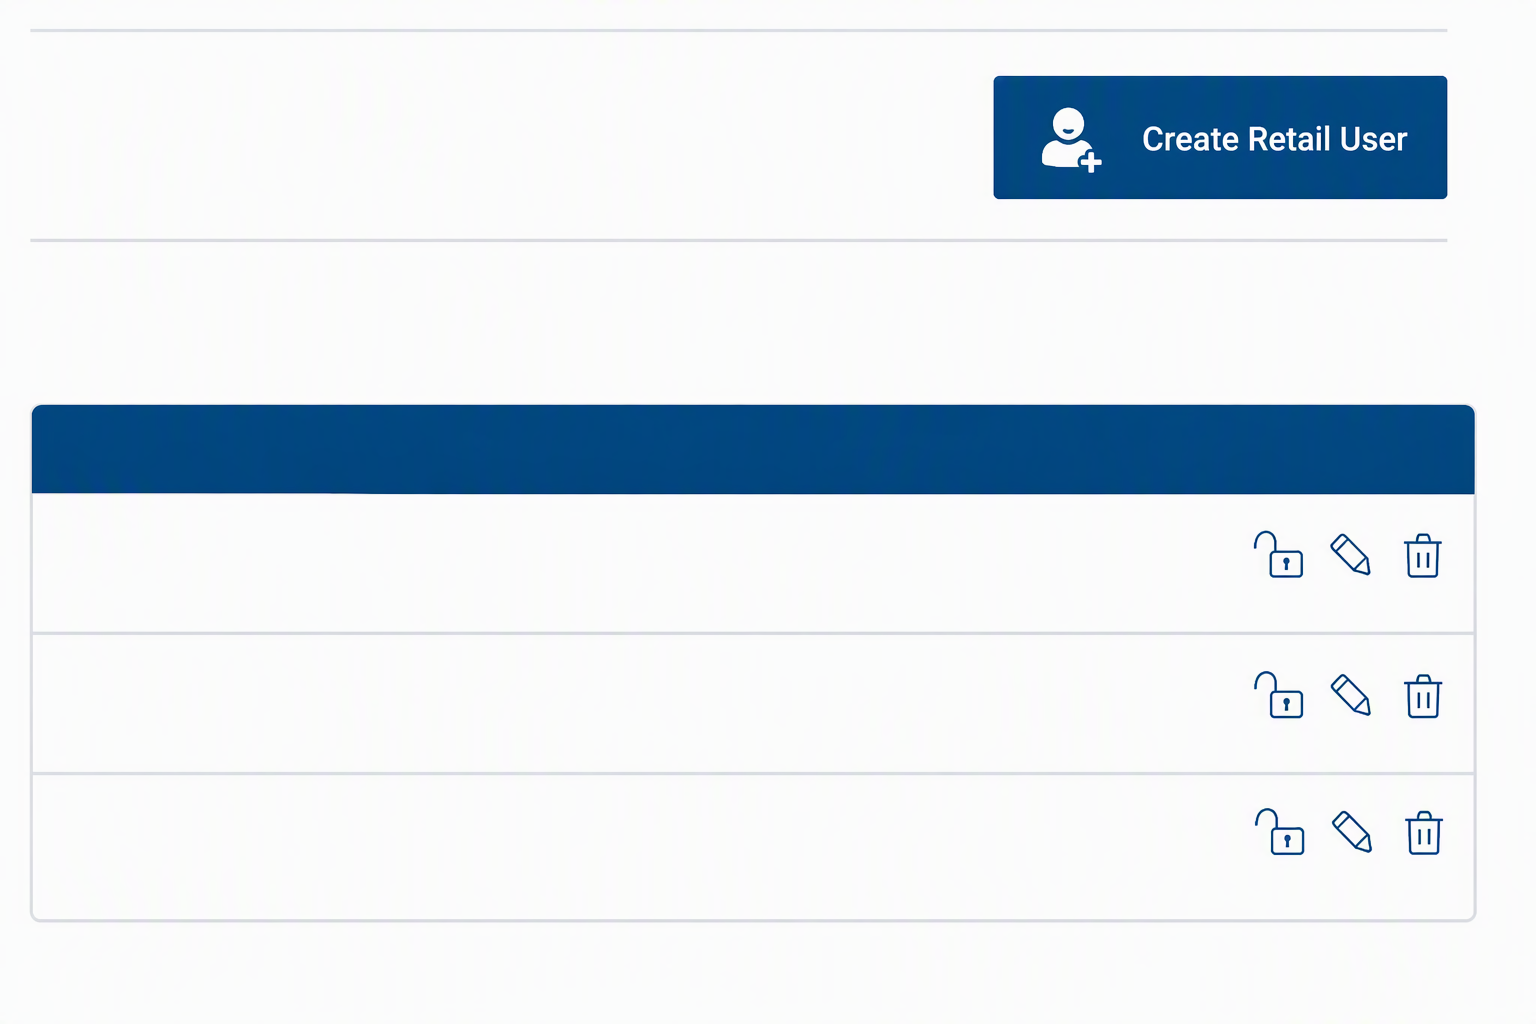
Step 2: Reset MFA
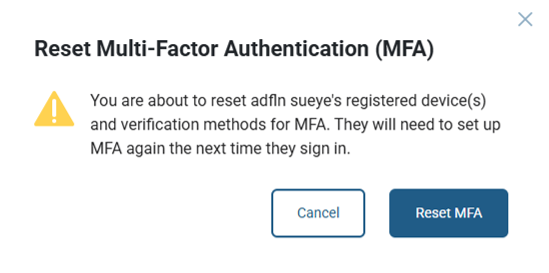
- Locate the applicable user and select Reset MFA. A confirmation window will appear. Select Reset MFA to proceed.
- A confirmation message will appear indicating the MFA reset was successful.
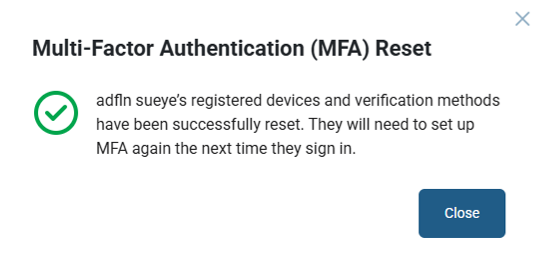
- Once MFA has been reset, the user will be required to complete the MFA enrollment process again during their next sign-in.
- After the user completes MFA setup, the Reset MFA option will once again become available for that account.
Users with User Management permissions can also remove a registered MFA device.
- Select the Edit (pencil) icon beside the applicable user.
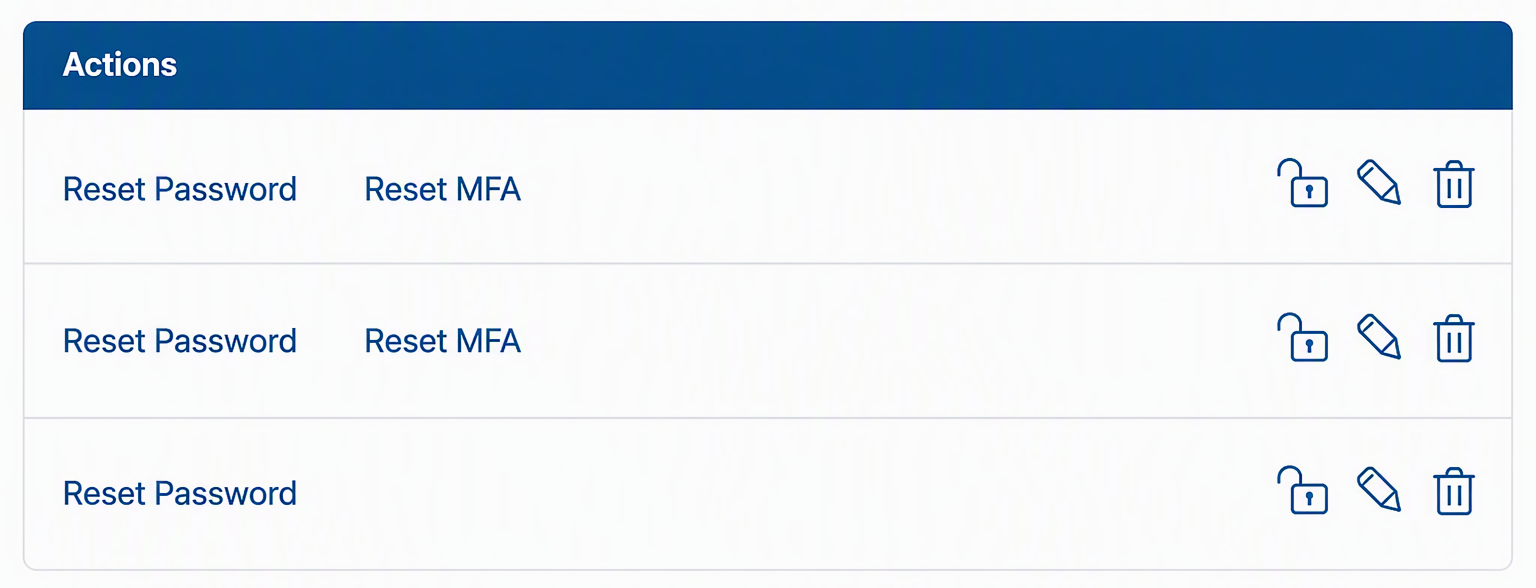
- The User Details page will open. From this page, the registered MFA device can be removed as required.
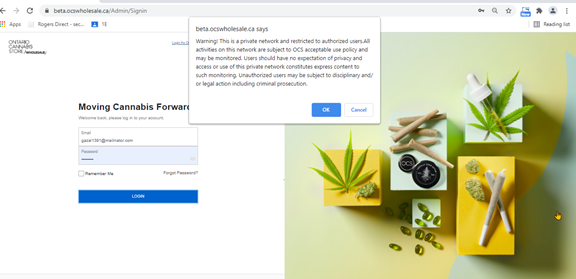
When you sign in to the OCS B2B Portal, you may see a disclaimer outlining our network security and privacy measures. Select OK to proceed.
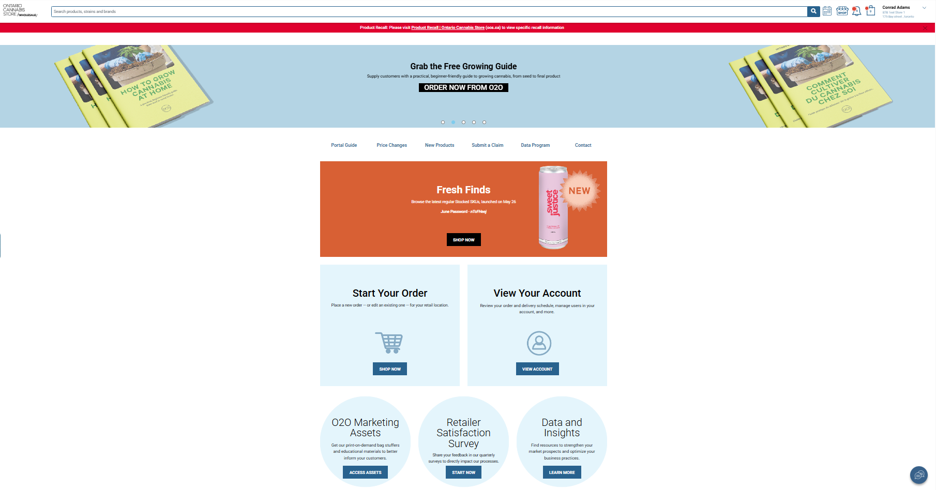
From the Portal home page, you will be able to shop the wholesale store, view your account access key resources, including the Portal Guide, Price Changes, New Products, Submit a Claim, Data Program and Contact.
Note: The layout and content of this page may change periodically.
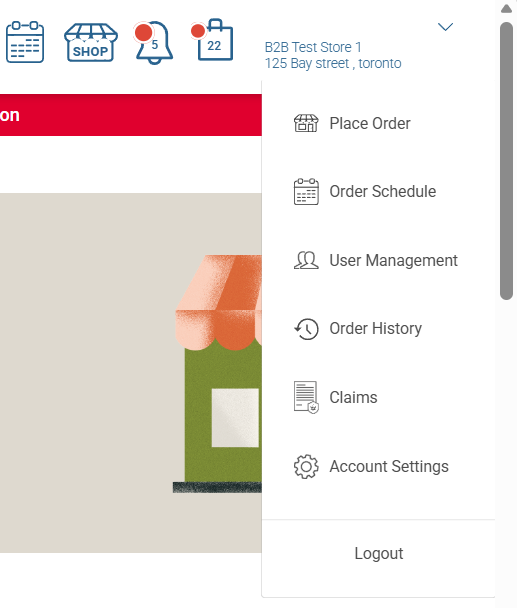
The upper navigation bar contains several icons to help you on your shopping journey, including the following:
- Calendar Icon: When you click the Calendar icon, any relevant information regarding your upcoming Order Window and Delivery Day will be displayed.
- Shop Icon: When you click the Shop icon, you’ll be taken to the B2B Shop Page, where you can browse products and begin your shopping experience.
- Notification Bell: The Notification Bell icon houses all important notifications, from operational updates to delivery information.
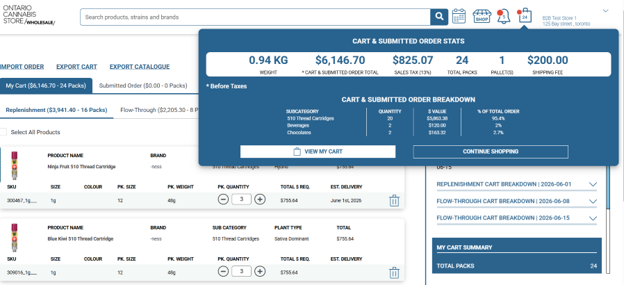
- Shopping Bag Icon: The Shopping Bag icon opens a cart window that contains important information, such as Submitted Order stats, Order Breakdown and more. From here, you can click to View Your Cart or continue shopping.
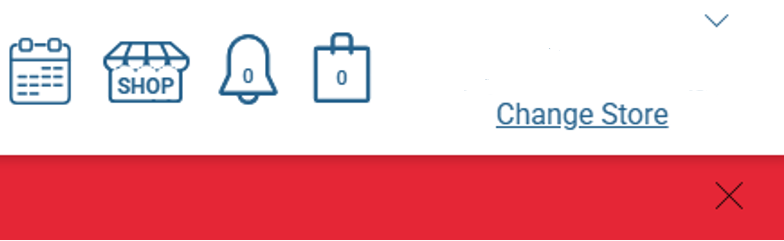
- Change Store: If you have access to multiple stores, you can switch between locations by selecting Change Store on the upper right-hand corner of the screen. To provide a store user with access to multiple locations, please refer to Manage Your Users.
The site navigation menu can be found at the top right of your screen. Select the drop-down menu to access the following:
- Place Your Order: Place or edit an existing order for your retail location(s).
- Order Schedule: Verify your order and delivery schedule and keep track of key dates.
- User Management: View or edit users associated with your retail location(s).
- Order History: View your past orders, including order documentation. Note: You can also reorder a previous order by selecting the Order ID link on the Order History page.
- Claims: Quickly access any submitted claims.
- Account Settings: Manage and update your account information.
Note: After 60 minutes of inactivity, you will be logged out of your account and will need to log in again to access your account.
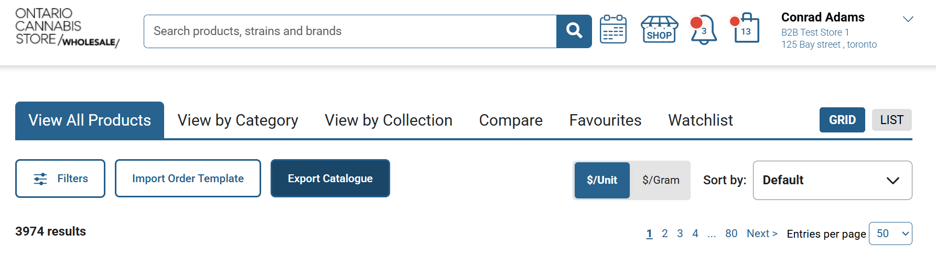
Use the Export Catalogue to view listed and delisted products. This file can also be used to import product information into your Point of Sale (POS) system.
For information on importing product data into your POS system, please contact your POS provider directly.
Browse and Place Orders
Learn how to toggle between views and navigate Product Listing Pages (PLPs).
Product Listing Page (PLP)
You can access the Product Listing Page (PLP) and browse products by selecting the Shop icon from the navigation bar or by clicking the SHOP NOW button from the home page.
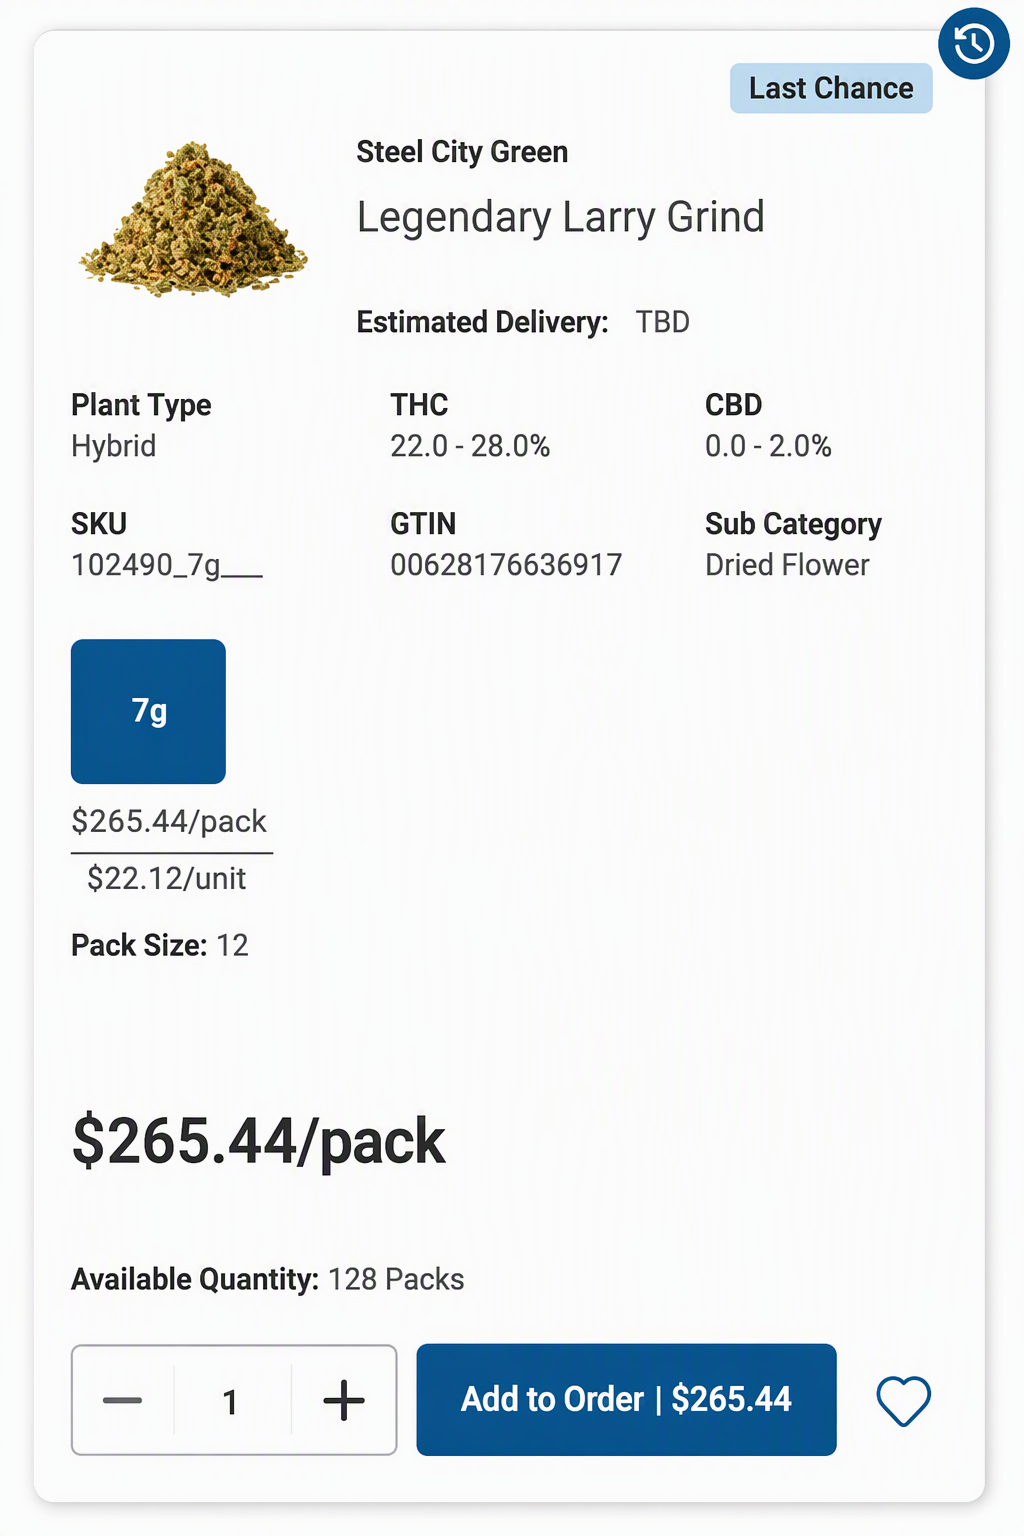
On the PLP, you’ll see the following information:
- Product Image
- Brand
- Item Name
- Estimated Delivery Date
- Plant Type
- SKU
- THC
- CBD
- GTIN
- Sub Category
- Item Size
- Price Per Pack
- Price Per Unit
- Pack Size
- Available Quantity
- Quantity Selector
- Add to Order
- Save to Favourites
- Badge (if applicable)
- Information Tag (if applicable)
- Add to Watchlist (if applicable)
1
Product Image
2
Brand
3
Item Name
4
Plant Type
Product Search Filters
On the Product Listing Page, you can use the Filter button to refine your results and also save filter sets for future use.
Filter options include:
- Show Out of Stock
- Previously Ordered
- Subcategory
- Fulfilment Method
- Size
- Price per Unit
- Plant Type
- THC
- CBD
- Brand
- Licensed Producer
- Product Badges
- Terpenes
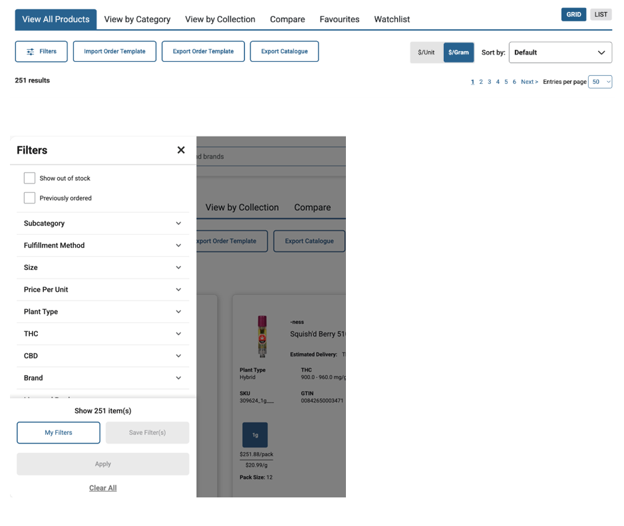
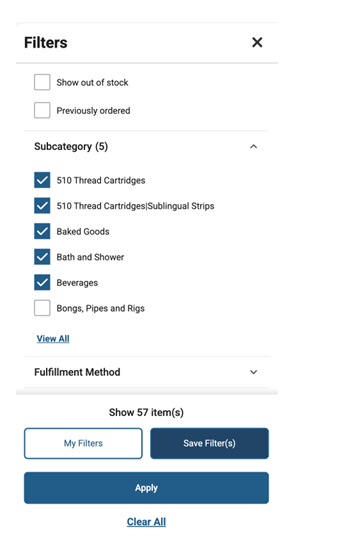
When you have configured one filter option, you can click the Save Filters button to save the filter set. You can set a name for the filter set to easily identify it in the future. To access your customized filter selection in the future, go to My Filters.
Price per unit/gram toggle
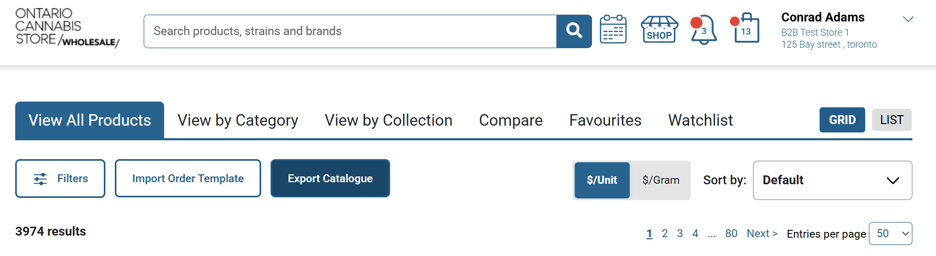
Depending on your preference, you can also choose to view the price of a product by unit or per gram. To change the price view, select the $Unit/$Gram toggle button.
Grid or List Views
You can view products on the PLP in either a grid or list view. The grid view is the default setting. Select the List button to customize the PLP list view item attributes and the order in which they appear.

Watchlist
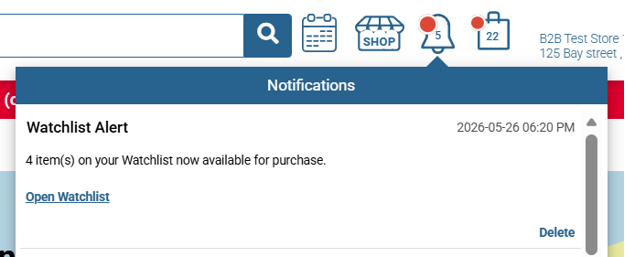
Watchlist allows users to track out–of–stock products. You will be alerted with a notification when a product is back in stock. You can also use the Watchlist tab, located on the Product Listing Page, to analyze tracked items.
Product Badges and Tags
The following are product badges and tags you will find on the PLP.

Lottery – Because this product is fast-moving or experiencing supply constraints, it is subject to a randomized lottery process that will determine allocation once the Order Window closes. Lottery SKUs are also on daily allocation and evenly distributed across all order days in the order cycle to ensure equal access.

Item is in My Cart – A quantity of this item is in your cart. Hover over the badge to show the total count of all variations of the product in your cart.

Craft Cannabis – The Craft badge identifies a product that comes from a smaller-scale artisanal cannabis Licensed Producer with a growing facility that produces less than 10,000 kilograms of dried flower per year.

Clearance – These are SKUs that are discounted to sell through remaining inventory at the OCS Distribution Centre before being delisted.

Coming Soon – This tag marks products that are part of an upcoming product release.

Upcoming Price Change – These products are scheduled for an upcoming price change.

Last Chance – Last Chance products will not be restocked at the OCS Distribution Centre once inventory is depleted. These items may not run out of stock immediately, and they may become Flow-Through SKUs.

Flow-Through – The Flow-Through distribution model lets you order from an expanded catalogue of items that are not stocked in the OCS Distribution Centre. You can reserve a Flow-Through item by submitting your order. The estimated delivery date will be noted on the Product Card.
Note: To understand whether a Flow-Through product is Standard (seven-day delivery to OCS) or Expedited (two-day delivery to OCS), please reference the Export Order or Master Catalogue files or the Estimated Delivery Day.

Previously Ordered – This product was ordered in a previous order submission within the past six months. Hovering over the badge will show your purchase history for all variations of the product, plus the pack sizes and last four order dates.

Back in Stock – Products that come back in stock will be labelled with this product tag for one order cycle.
Aged Inventory – These discounted SKUs exceed the packaged-on date threshold as outlined in the OCS Authorized Cannabis Retailer Handbook.

New Arrival – These products are from the latest product release.
View Product Detail Page
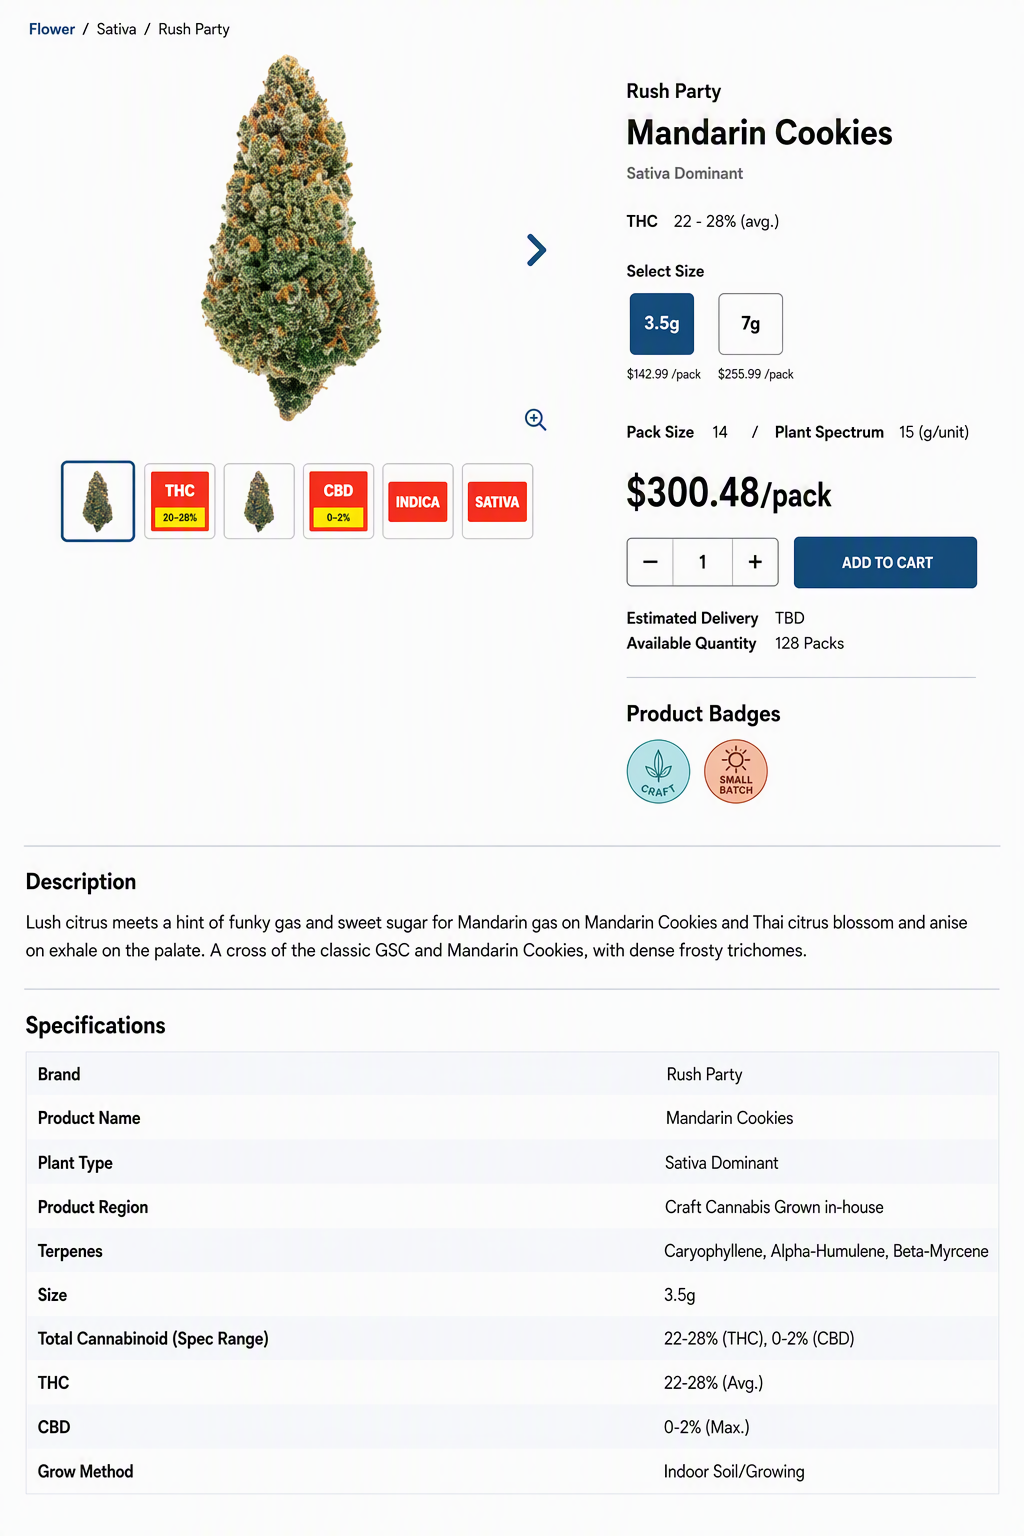
The Product Detail Page (PDP) provides you with detailed information about each product.
Below the initial product information, you’ll find supplementary details about the product. You may also add products directly to your cart from this page.
Adding Products to Your Cart
Use the Product Listing Page (PLP), Product Detail Page (PDP) or Order Import to add products to your cart
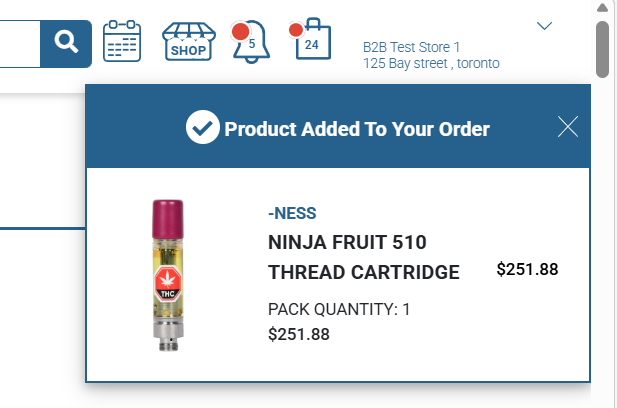
Once you add a product to your cart, you’ll see a pop-up confirmation and a blue badge will appear on the item on the PLP. Select the Shopping Bag icon in the navigation bar or select View My Cart to see a summary of your order.
Export Order Template and Import Order Function
This guide outlines how to quickly submit an order using the Import Order feature in the B2B Portal. Many Retailers report that this function saves valuable time.
Here’s a refresher on how the Import Order feature works and how easy it is to use.
You may import any .xlsx formatted Excel file to the B2B Portal to place your order. The file must include two columns labelled “SKU” and “Quantity”. These columns are required for the system to process the data. You may also export the Excel Order Template provided on the B2B Portal.
How to Export the Order Template
Follow the steps below to export the order template from the B2B Portal:
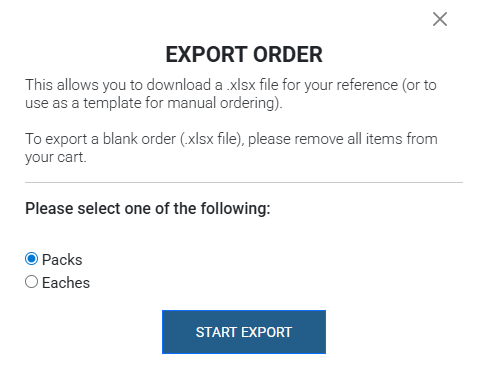
Navigate to the Product Listing Page and select Export Order Template.
- The Export Order Template option is available only on your assigned order day and the day prior, based on the store you are currently logged into. Outside this window, the option is unavailable because inventory availability may change.
- Product Information is typically refreshed each Tuesday at the beginning of the Order Cycle, so Retailers are encouraged to use the most up‑to‑date version of the Export Order Template when building and submitting orders using the Import Order feature.

Select quantity format and download
Choose how you want quantities displayed (Packs or Eaches) and then click Start Export to download the order template file.
- Any items currently in your cart will be reflected in the exported file.
- Inventory availability will be validated and updated when the file is imported back into your cart.
How to Build your Order
If you wish to add or adjust products after exporting the template, you can make changes directly in the file.
Helpful Tips
- To view only cannabis products, apply the Plant Type filter and remove blank values.
- When importing an order, only the SKU and Quantity columns are read by the system. If either column is missing or incorrectly labelled, the file will not upload.
- Confirm inventory levels before submitting the order template.
- Review the Estimated Delivery Date column to understand when products will arrive in‑store and prepare for delivery and payment capture.
How to Import an Order
Follow the steps below to import your completed order.
Import your file
The Import Order option is available only on your assigned order day. Outside this window, the Import Order option is disabled.
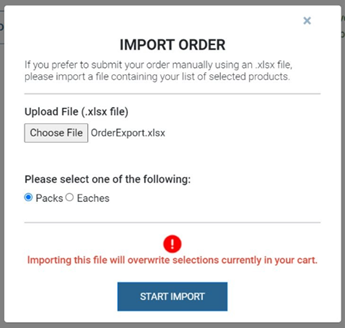
From the top of the Product Listing Page (PLP), select Import Order.
- Choose the quantities you entered in your order: Packs or Eaches.
- If quantities are entered in Eaches and do not equal a full case, the quantity will be rounded down to the nearest case.
- Any items currently in your cart when the file is uploaded will be overwritten.
- Imported files may have any filename. Orders are placed for the store whose B2B Portal profile is currently signed in. Including a store name or number in the file name does not assign the order to a different store.

Review and complete your order
- Once the import is complete, the requested products have been added to your cart.
- You can add additional products manually using the PLP before submitting your order.
- Within the cart, you can confirm that your requested quantities do not exceed the available inventory levels before submitting the order.
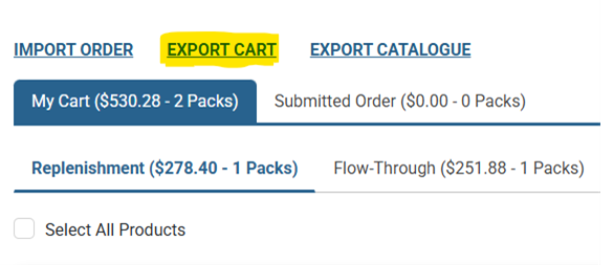
- You may also export your cart into an Excel file from the Cart page to review and validate requested order quantities against available order quantities and address any potential shortages before submitting your order.
- After you review your cart, you must submit your order by using the check box to ‘Select All Products’ and then proceed with submission.
- Once submitted, items cannot be modified or removed from your order.
Review My Cart
View unsubmitted SKUs that you have added to your cart through the Product Listing Page product page or order template import process.
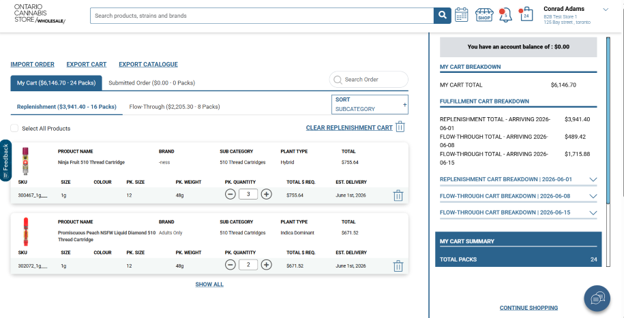
My Cart Tab – This tab displays a breakdown of items that have been added to the cart and their classifications. Since the order hasn’t been submitted, these items are not reserved, and quantities can still be changed. Products in the cart are sorted by sub-category (this is the default setting). Be sure to review the Estimated Delivery Date column to ensure you understand when products are arriving in-store and be prepared for delivery and payment capture.
Note: You can still build your Stocked cart during the additional Flow-Through Order Window. However, the Stocked Submit button will be greyed out and not functional.
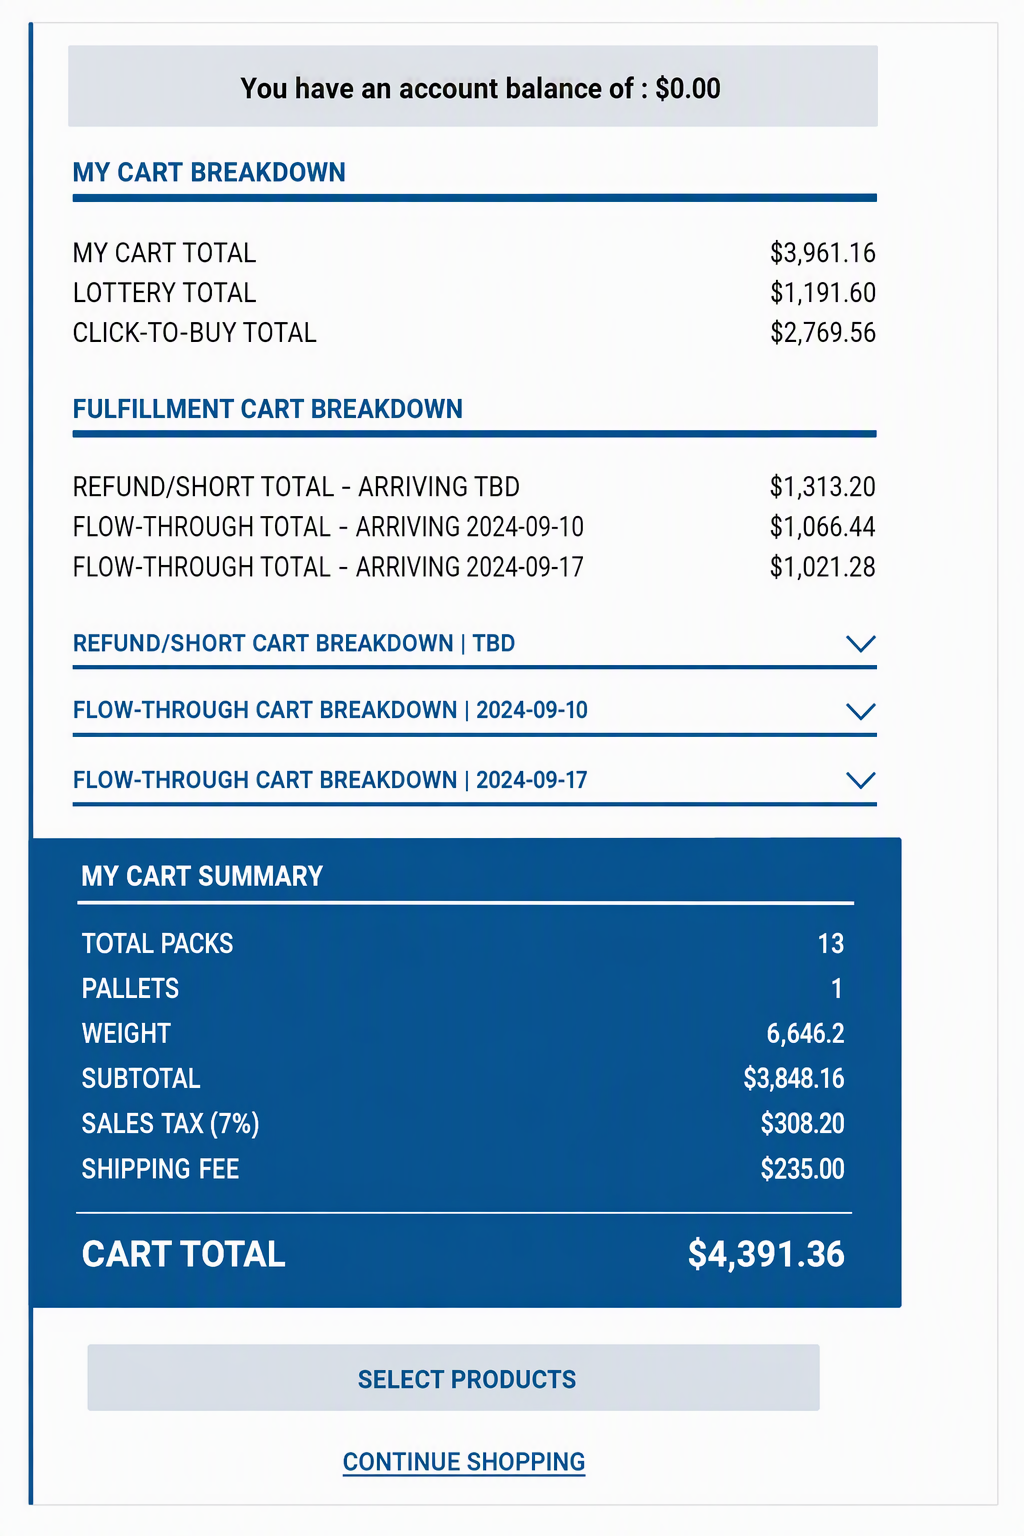
1
Toggle between My Cart and Submitted Order tabs to see pack counts and total dollar value (not including sales tax or shipping fees).
2
Toggle between replenishment and flow-through orders.
3
See the selected Lottery products including the total pack count.
4
See the selected Click-to-Buy products that have not yet been submitted for purchase.
5
Use Show All to expand the list.
6
Search for a single item by SKU, brand or name.
7
Sort your cart by cost or quantity or alphabetically.
8
Clear your replenishment or flow-through carts.
9
See a list of your total selected items, separated by Click-to-Buy items and Lottery items, as well as a summary of the combined items and their total cost.
10
Return to the Product Listing Page.
Note: Flow-Through orders are grouped by estimated delivery date. To understand whether a Flow-Through product is Standard (seven–day delivery to OCS) or Expedited (two–day delivery to OCS), please refer to the Order Export and Master Catalogue files.
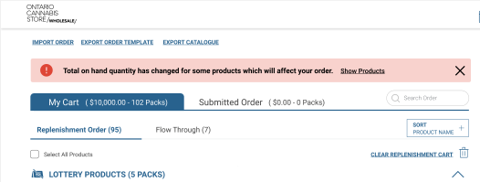
Any changes to the available quantity for products that impact your order will be highlighted on the My Cart page. The available quantity of a SKU will decrease as other users submit their orders.
Submit an Order
View the list of SKUs you are committing to purchase.
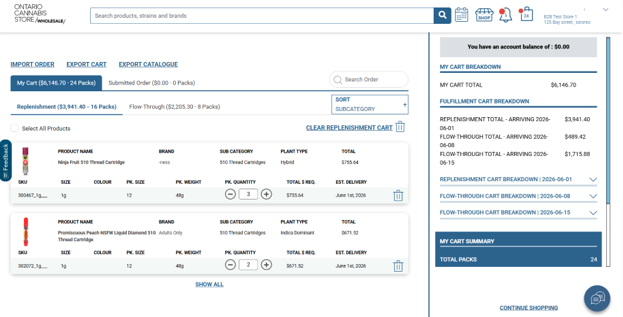
1
Select all items currently in your cart.
2
Use the checkbox to select individual items.
3
Change the quantity of a product prior to submission.
4
Submit your selected products. You will be asked to confirm your commitment to purchase these products.
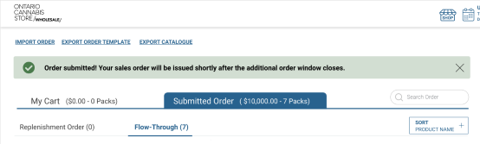
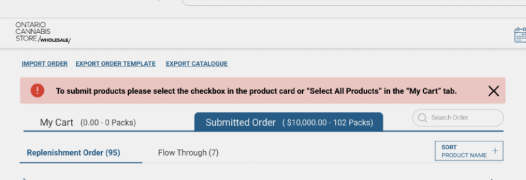
You will receive this error message if you submit an order with no products selected.
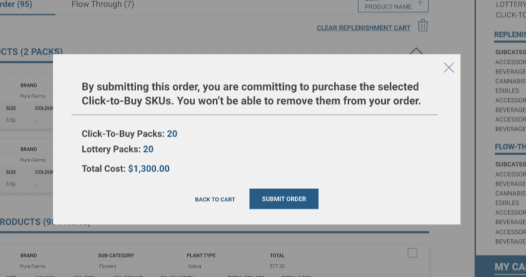
This is the last opportunity to edit your selected items before submitting your order. Once submitted, items cannot be modified or removed from your order.
View Submitted Order
View a breakdown of the SKUs you have committed to purchase and for which you have entered the lottery
Submitted Order – This tab displays products you have ordered.
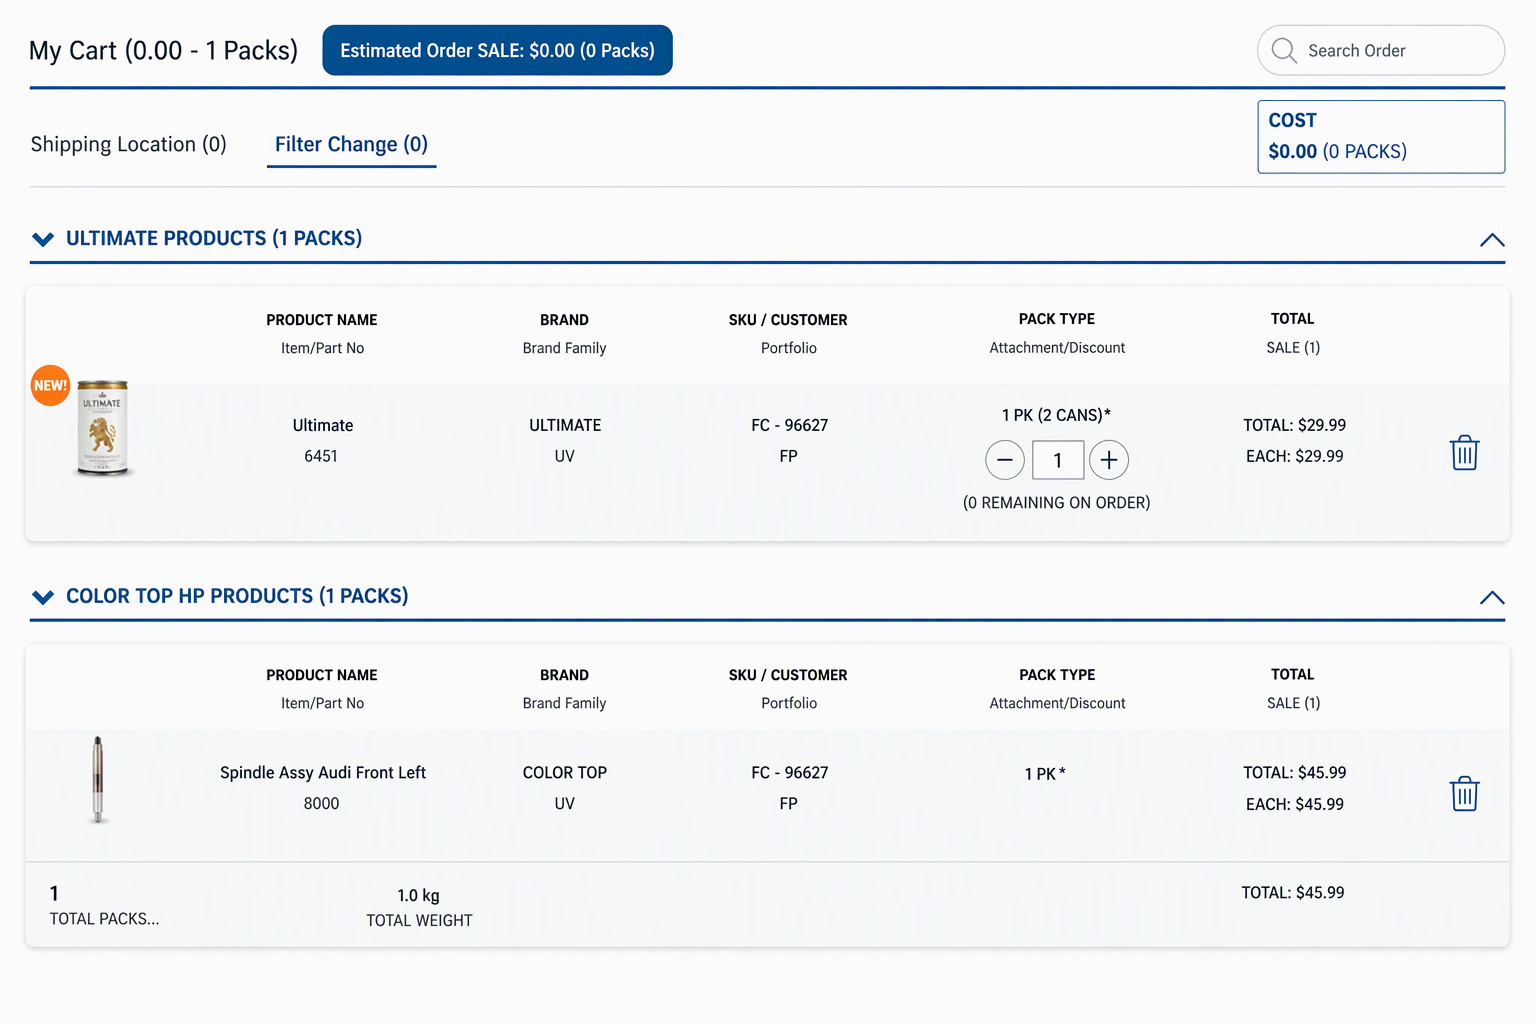
- After you submit your order, you will be taken to the Submitted Order tab, which displays a subtotal before sales tax and shipping fees.
- After you complete your order reservation, you will receive a notification.
- If you have left any products unselected from the previous screen, they will remain in your cart.
- Changes to order quantities as a result of changes to available quantity will be called out on the page. You can click on the product name for more details.
- The Exclamation Point icon is used to flag any items that have been adjusted due to quantity changes.
- This panel will itemize your Submitted Order, inclusive of sales tax and shipping fees.
- If you are on pre-payment terms, your account balance will be displayed as a credit.
- Search for a single item by SKU, brand or name.
- Sort by subcategory, brand, price and more.
- Select Continue Shopping to return to the PLP.
See Order Details
View final totals for your order submission.
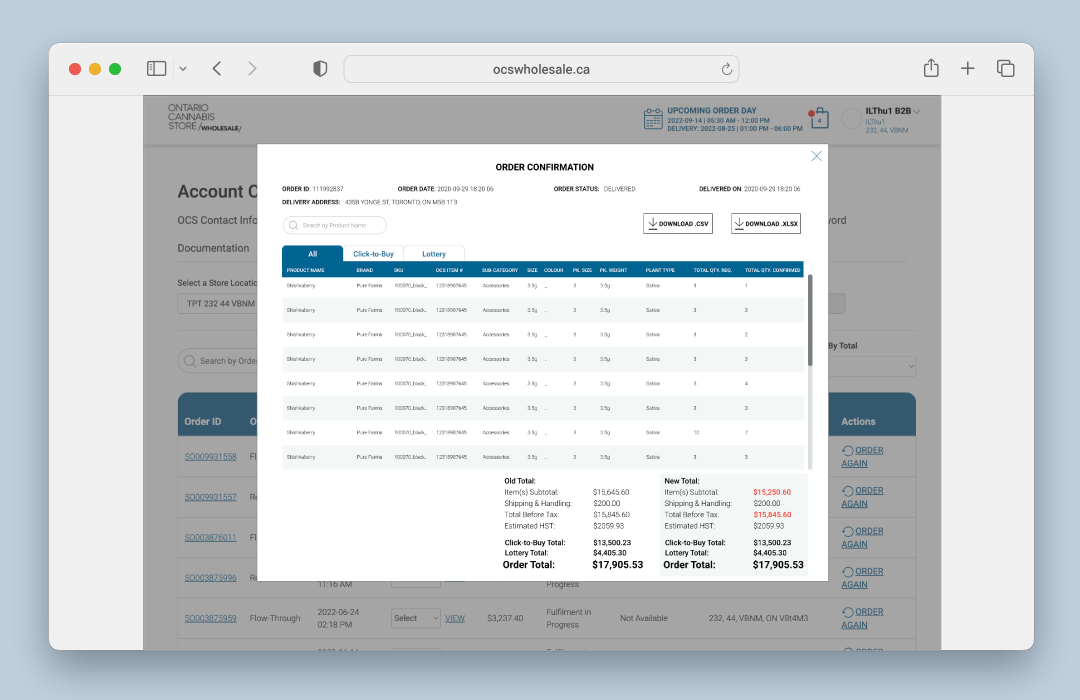
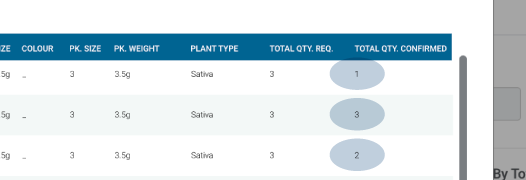
“Total Qty. Confirmed” reflects the quantity available for fulfillment at the time of submission.
Submitting Product Claims and Claims Dashboard
Product Claims can be submitted using the Claims Dashboard. The Claims Dashboard will allow you to submit claims for product quality issues, overages or shortages. It also provides a snapshot of your claims history, status and credit notes, if applicable.
To learn more about how to search, edit, delete and create new users, as well as lock user permissions, see Manage Your Account.
Submitting a Claim
Navigate to the Account Centre and click on the Claims tab. From there, click on the Start a Claim Button.
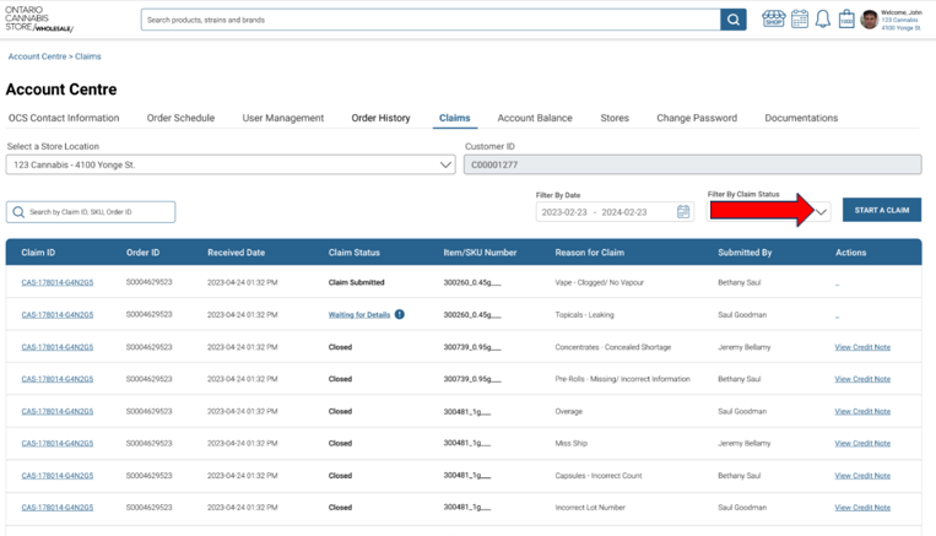
Submitting a claim for overages, shortages and quality assurance–related issues
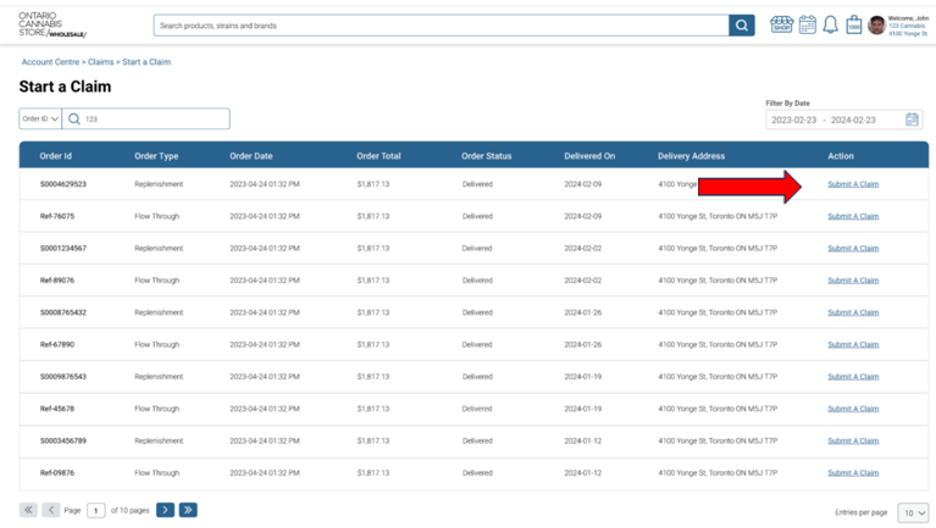
Step 1: Locate the affected product(s) for your claim submission using one of the following two options:
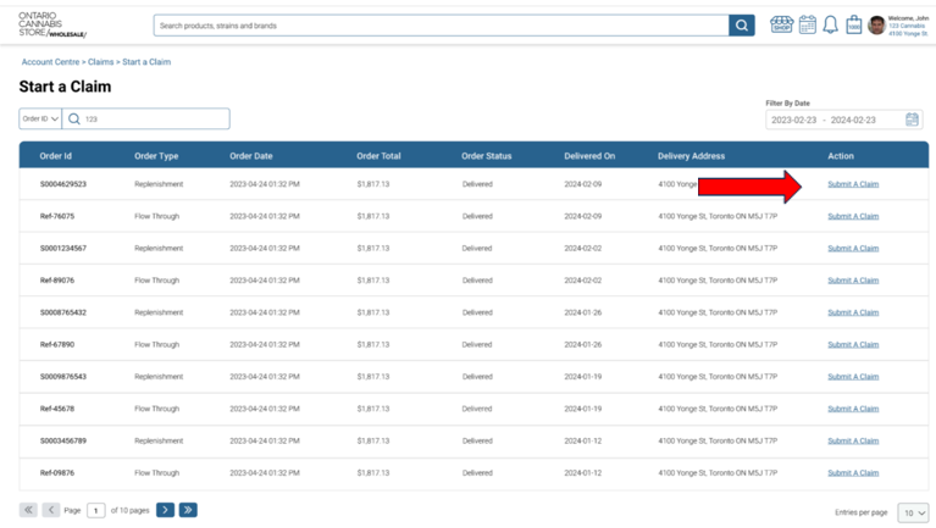
Option 1 – Find the applicable Sales Order and click on the Submit a Claim button.
Option 2 – Use the search bar to search for the item you wish to submit a claim for. You can search by SKU number, GTIN number, lot number, item name and brand.
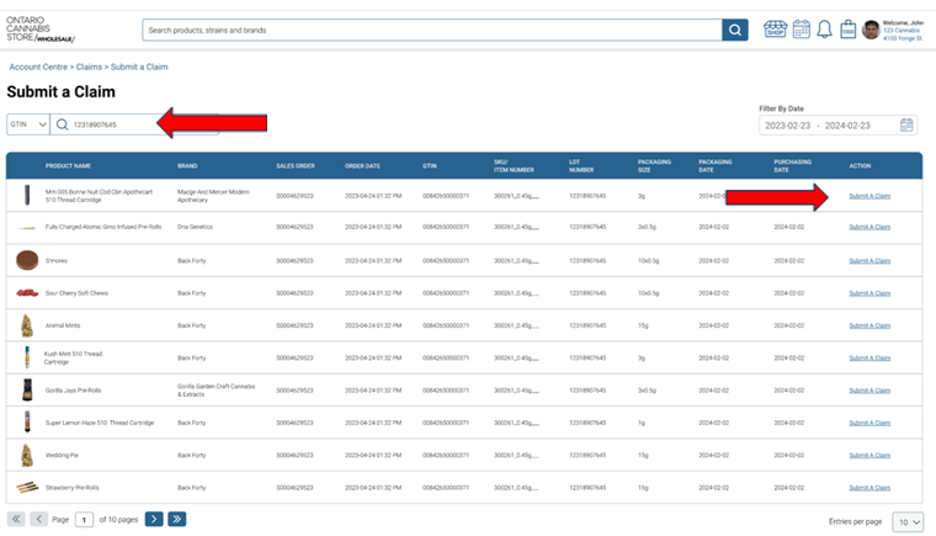
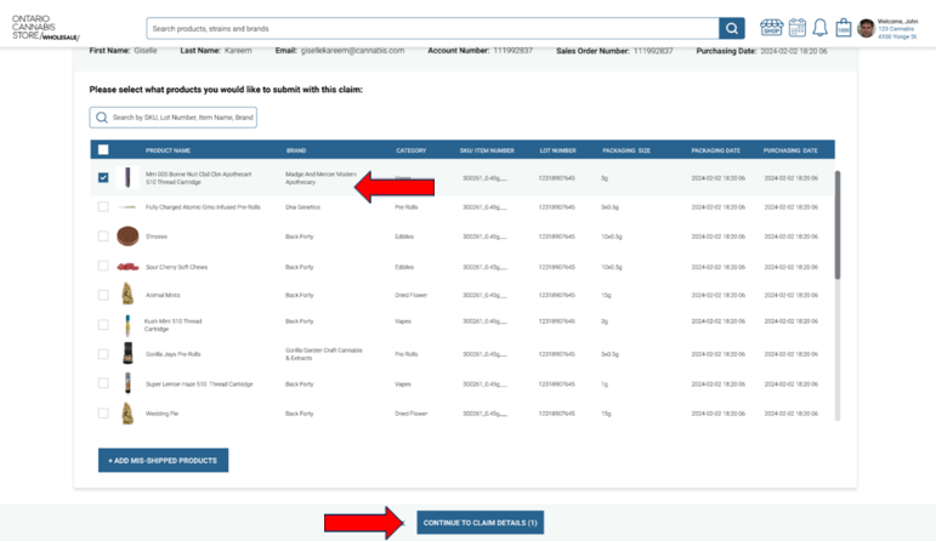
Step 2: Select the product(s) you would like to submit with this claim. When you are done selecting all items in the Sales Order, click on the Continue to Claim Details button. Multiple claims from the same Sales Order can be submitted together.
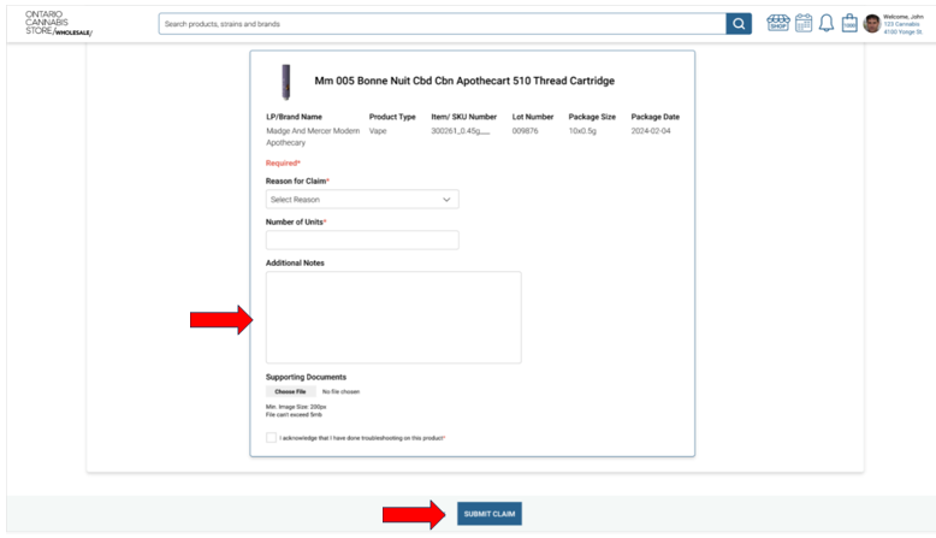
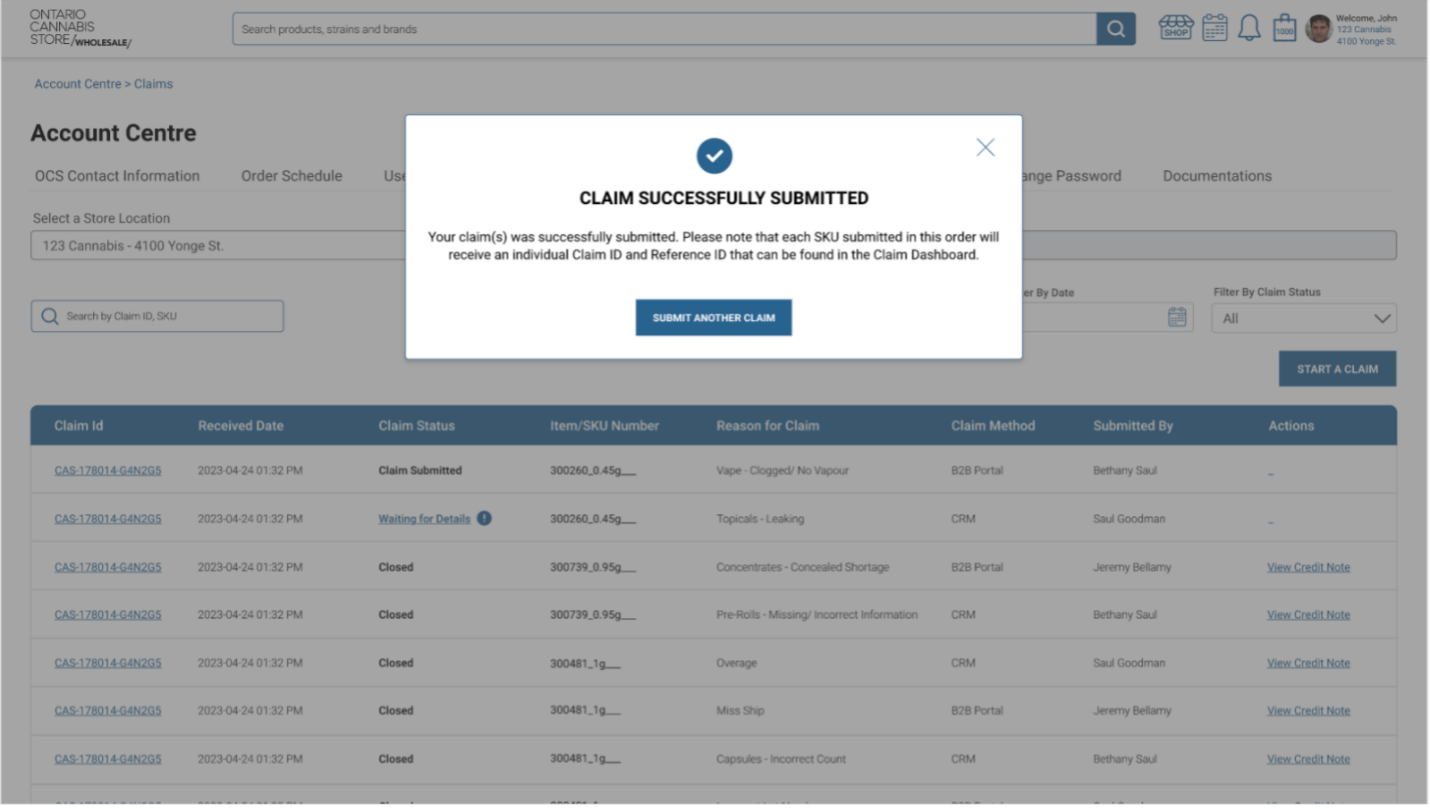
Step 3: Enter the details of the claim, including the reason for the claim and the number of affected units, and attach any pictures. Multiple pictures may be submitted; each photo must be 5 MB or less. Click the box to acknowledge that troubleshooting has been completed, where applicable. Once completed, click the Submit Claim button.
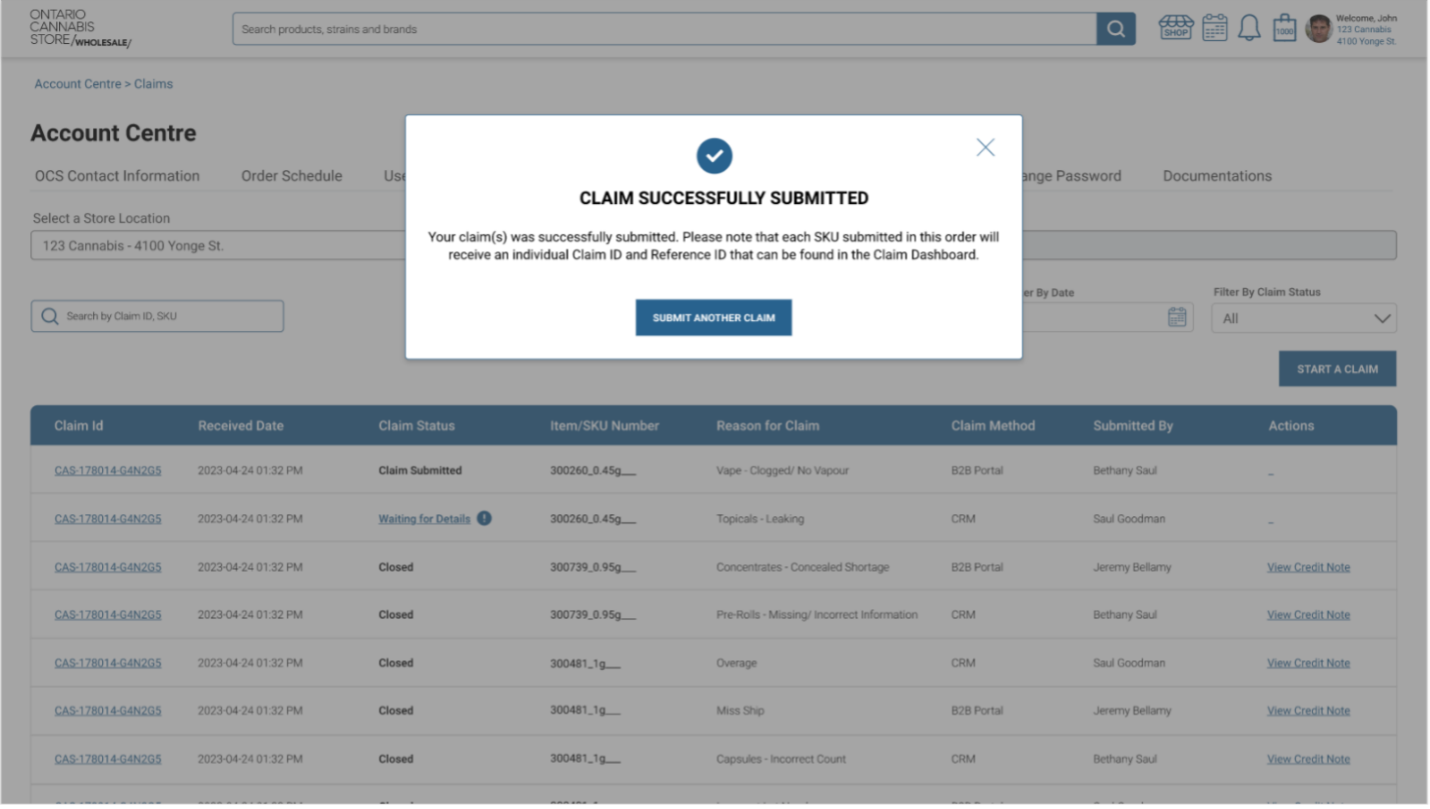
Once all steps are completed, you will receive a pop up indicating that your claim has been successfully submitted.
Mis-shipped Items
At times you may receive an item with your delivery that you did not order. In these instances, complete the following steps.
Step 1: Navigate to your most recent Sales Order and click on the Submit a Claim button.
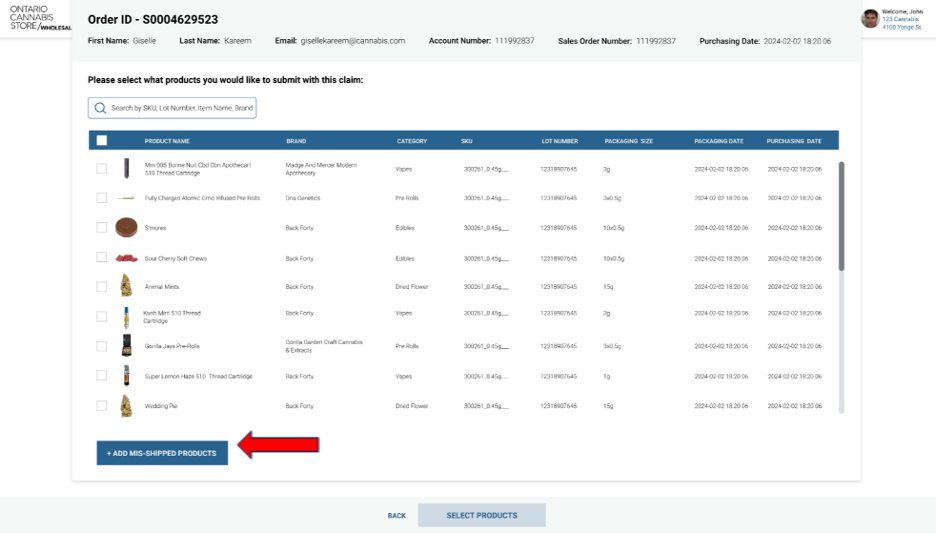
Step 2: Click on the Add Mis-shipped Products button.
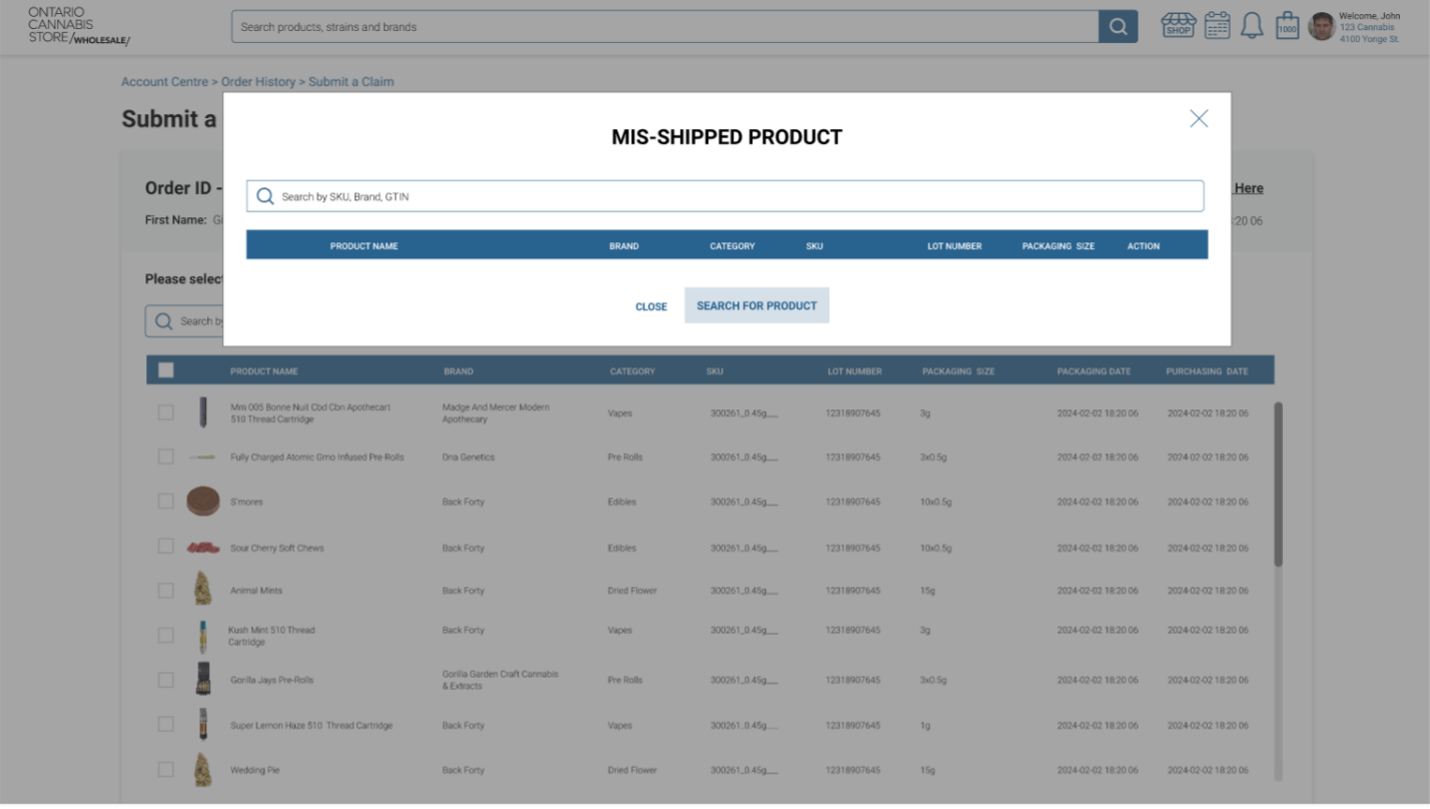
Step 3: Search for the item by SKU, brand or GTIN, and click on the Search for Product button.
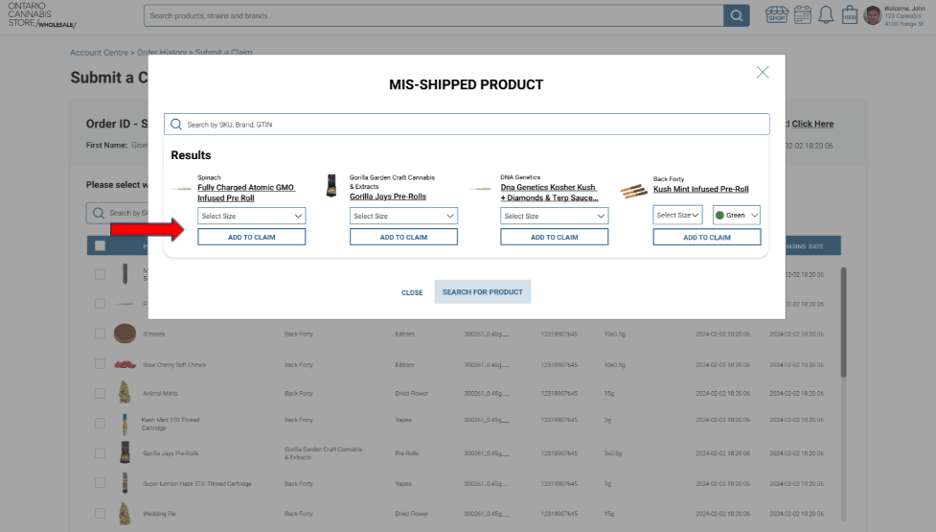
Step 4: Find the applicable item and click on Add to Claim button.
Step 5: Enter details of the claim, including the reason for the claim and the number of affected units, and attach any pictures. Multiple pictures may be submitted; each photo must be 5 MB or less. Once all information has been entered, click on the Submit Claim button.
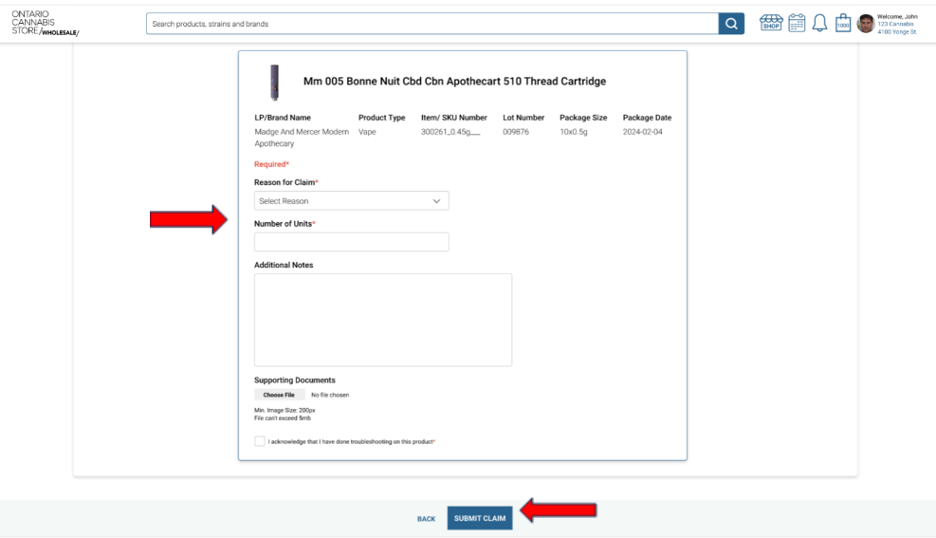
Once all steps are completed, you will receive a pop up indicating that your claim has been successfully submitted.
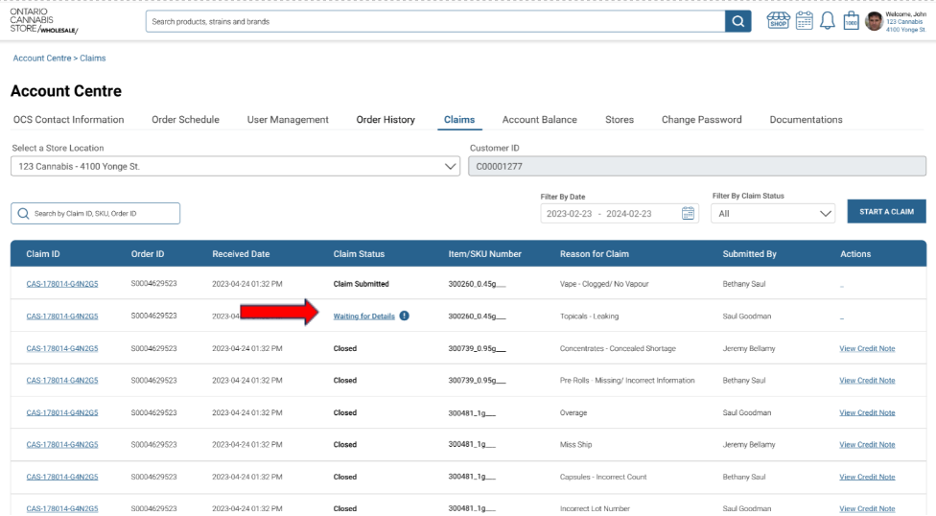
Additional information required
There may be additional information required to process your claim. If this is the case, you will receive an email and Notification Centre alert in the B2B Portal. Click on the link to navigate to the Claims Dashboard. Here you can view the status of your claims and which claims require more information.
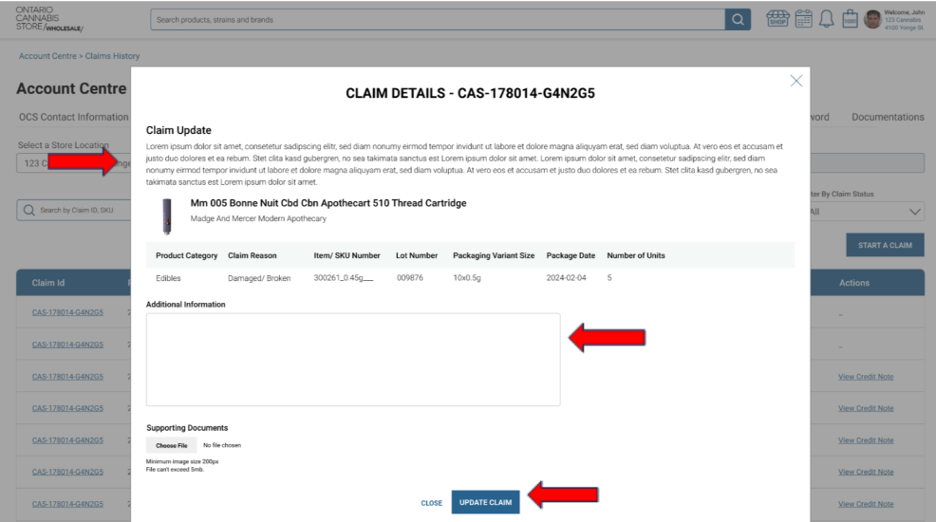
The Claim Update section will indicate what additional information is required. Enter in the required information in the Additional Information section or attach additional photos and click on the Update Claim button when complete.
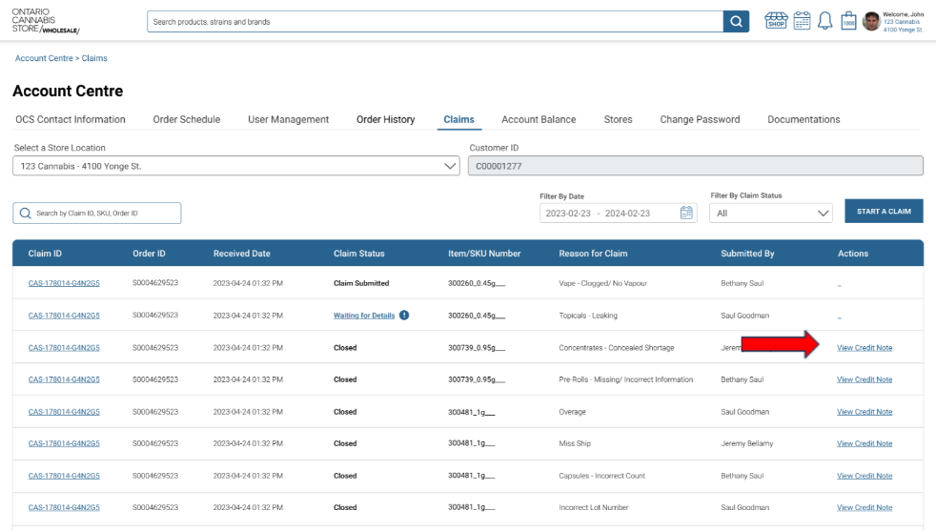
Viewing Claims
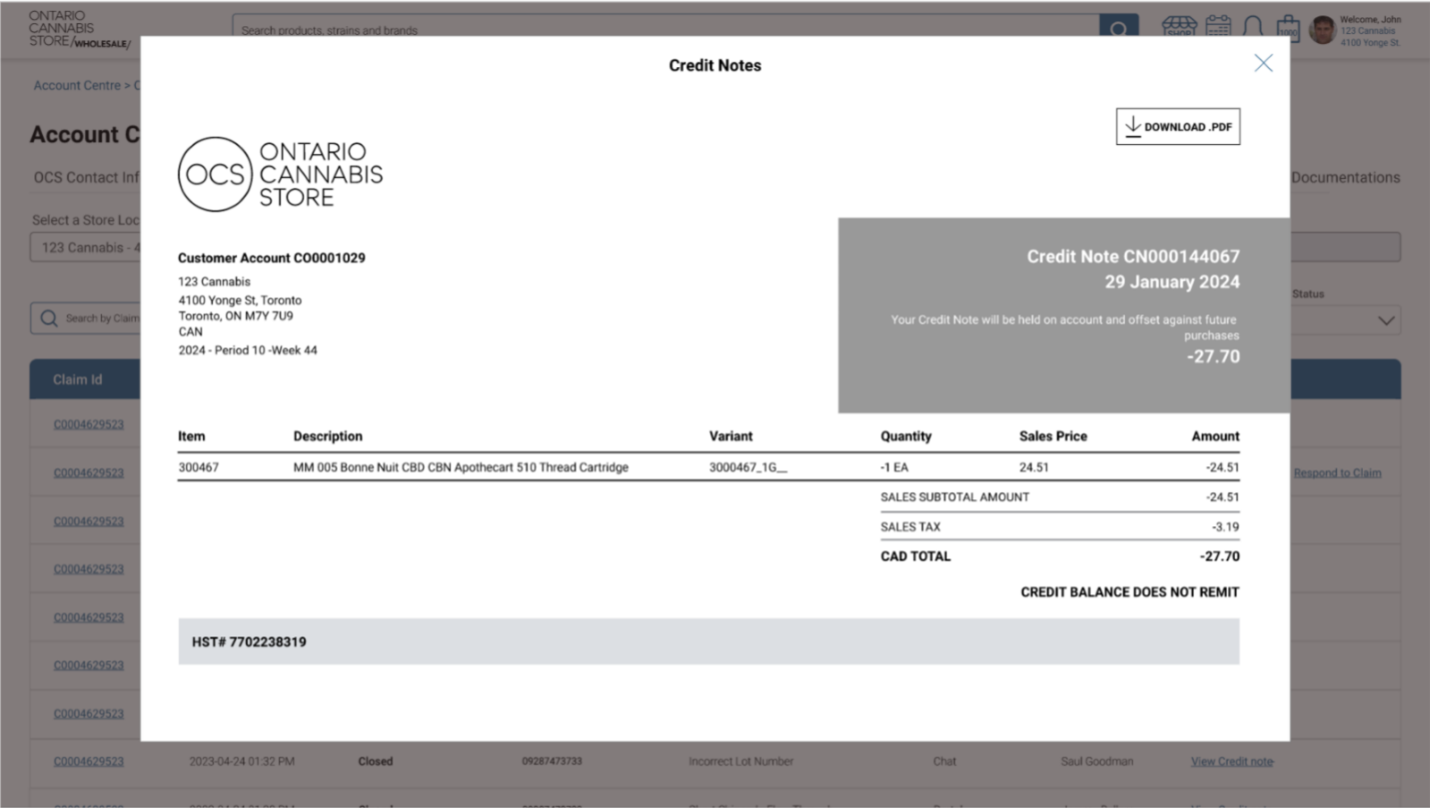
Once your claim is resolved, you’ll be able to easily identify it in the Claims Dashboard and view any related credit notes.
Manage Your Account
Manage your account information; view your order history, account balance, and order and delivery schedule; and manage your store users.
View and Edit Your OCS Contact Information
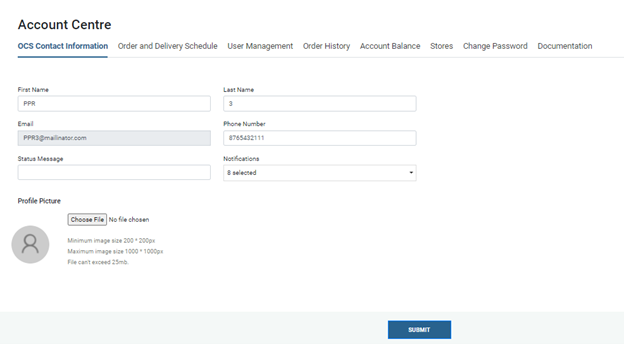
From the OCS Contact Information page, you can view and edit the following personal information:
- First and last name
- Phone number
- Status message — will be visible to other users assigned to your store
- Profile picture
Manage Your Users
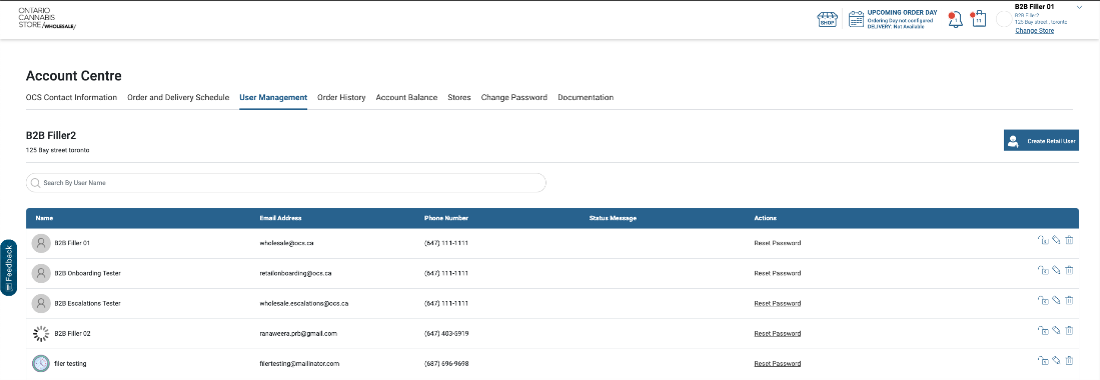
From the User Management page, you can view, search, edit, delete and create new users, as well as lock user permissions.
- To delete a user, select the Trash icon, displayed beside the user’s name.
- To edit a user, select the Pencil icon, displayed beside the user’s name.
- To lock a user, select the Open Lock icon, displayed beside the user’s name.
Note: If you get locked out of your account, please reach out to a Customer Service Representative to unlock it. - To create a new Retail user, select the New User icon on the User Management page.
Note: Store users who have access to multiple stores can have specific permissions assigned to them based on their role at each location.
To learn how to switch between store locations on the OCS B2B Portal, please refer to Section 2.1. Navigate the OCS B2B Portal.
Create a New Retail User
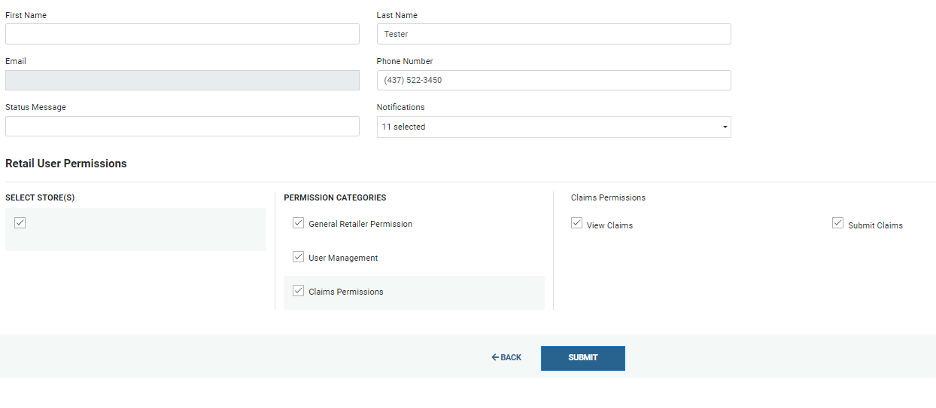
You can create new Retail users and assign user permissions within the OCS B2B Portal.
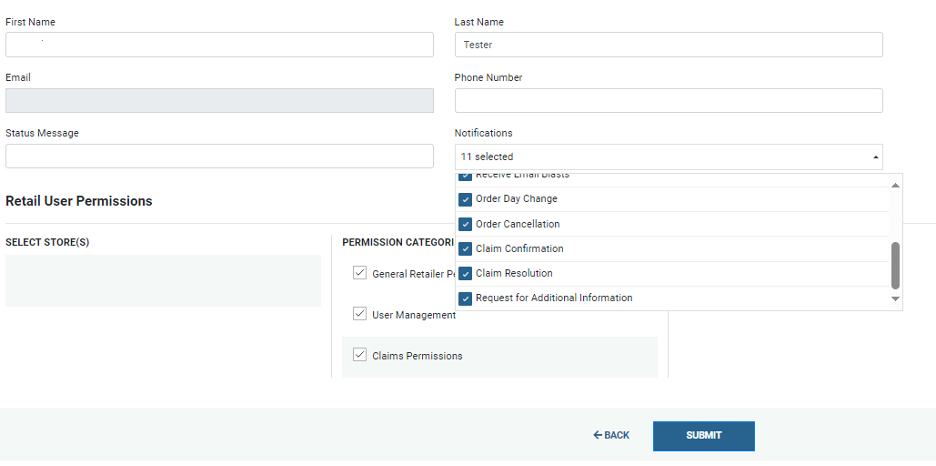
- From the User Management tab of your Account Centre, click Create Retail User and provide the required contact information for the new user.
- Update the user permissions.
-
- General Retailer permissions are associated with ordering functionality.
- User Management permissions are associated with managing users for your store.
- Claims permissions are associated with the ability to submit claims and view claims. View Claims must be selected in order to view the Claims tab and access the Claims Dashboard.
Note: If you make any changes to a user’s permissions, these changes will only be reflected once that user logs out and logs back in to the OCS B2B Portal. If a user is given permission to View Order Documents, they must also have permission to View Order History, as this is where all order documentation lives on the Portal.
3. To configure user notifications, click on the notifications drop-down menu and select from the following options.
- Order Confirmation: The user will receive an email notification once the Order Confirmation is ready on the day of your order. The email will include the confirmation as an attachment and a link to view the confirmation directly in the OCS B2B Portal.
- Order Cancellation: The user will receive an email notification if the order has been cancelled.
- Advanced Shipping Notice (ASN): The user will receive an email notification once the ASN is ready ahead of the scheduled delivery. The email will include the ASN as an attachment and a link to view the ASN directly in the OCS B2B Portal.
- Delivery Day or Time Change: The user will receive an email notification if the Delivery Day or Window is updated or changed. The email will include the updated Delivery Day or Window and a link to view the changes directly in the OCS B2B Portal.
Receive Email Blast: You can expect to receive informational emails from the OCS. - Order Day Change: You will receive an email notification if the Order Day or Window is updated or changed. The email will include the updated Order Day or Window and a link to view the changes directly in the OCS B2B Portal.
- Back In Stock Reminder: The user will receive an email notification if a product is back in stock.
- Invoices: The user will receive an email invoice once they submit their order.
- Claim Confirmation: The user will receive an email and notification once they submit a claim.
- Claim Resolution: The user will receive an email and notification once a claim is resolved.
- Request for Additional Information: The user will receive an email and notification if more information is required to continue processing a claim.
View Your Order History
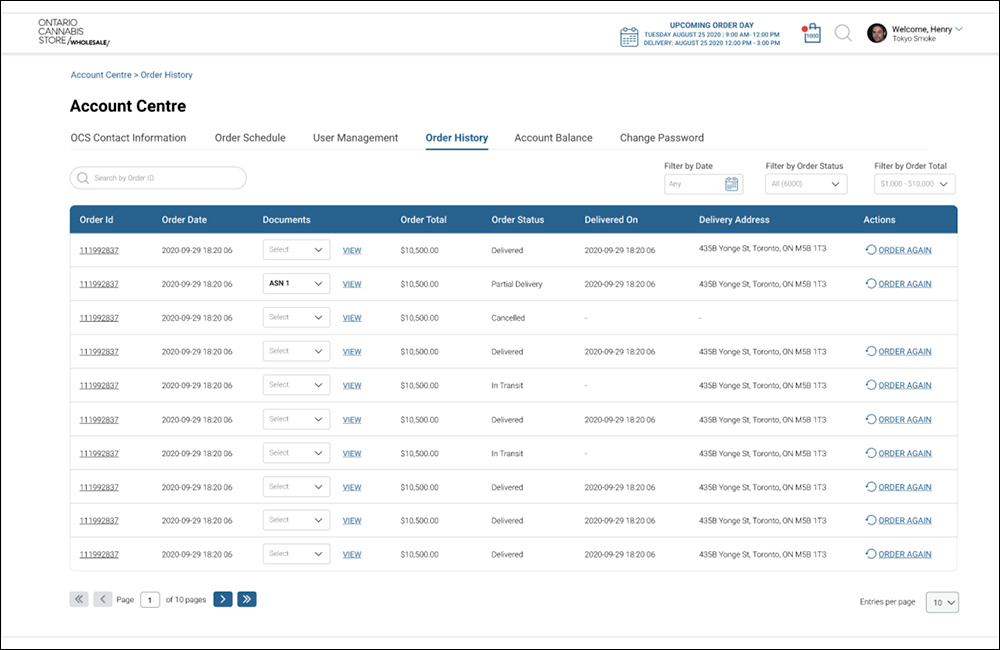
From the Order History page within your Account Centre, you can do the following:
- View past orders
- Search
- Filter by date
- View status
- View dollar total
- View order-related documents
- Submit a previous order
- Order display view
The Order Details page provides you with information on your current and previous orders, including the Order Date, Order Status, Delivery Window and Delivery Address. Select the Order ID to view a previous order or select the Order Again button to reorder a previous order.
To access documents related to an order, locate the order and select the desired document from the drop-down menu. Note: You can view the Order Confirmation, Advanced Shipping Notice or invoice within the OCS B2B Portal or download a copy.
To reorder a previous order, select Order Again.
Order Statuses
- Processing: Orders that have been submitted to the OCS.
- Fulfillment in Progress: Orders in the process of being fulfilled.
- Order Invoiced: Orders that have been invoiced.
- Partially Shipped: Orders that have been partially shipped.
- Shipped: Orders that have been fully shipped.
- Delivered: Orders that have been delivered.
- Deleted: Orders that have been deleted or cancelled.
Note: Any pending orders that you have submitted will appear in your Order History. Once the Order Window deadline has passed, all pending orders will be consolidated into one Sales Order Confirmation. For Flow-Through products, this will occur at the end of the Flow-Through order cycle.
View Your Account Balance
On the Account Balance page, you can view your account payment and credit history. You can also search for account activity by the sales order number and view your current account balance below the search bar.
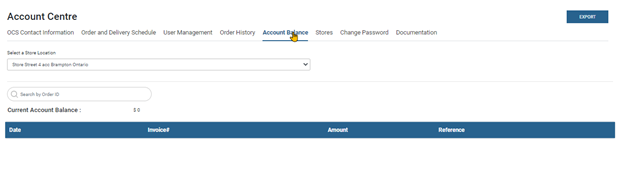
You can export an invoice by selecting the Export button in the top right-hand corner of the screen. You will need to select a Transaction Type and Date range before exporting the file as either an .xlsx or .pdf.
Change Your Password
You can change your current password by selecting the Change Password tab in Account Centre. If you get locked out of your account, please contact OCS Client Service Centre to unlock it.
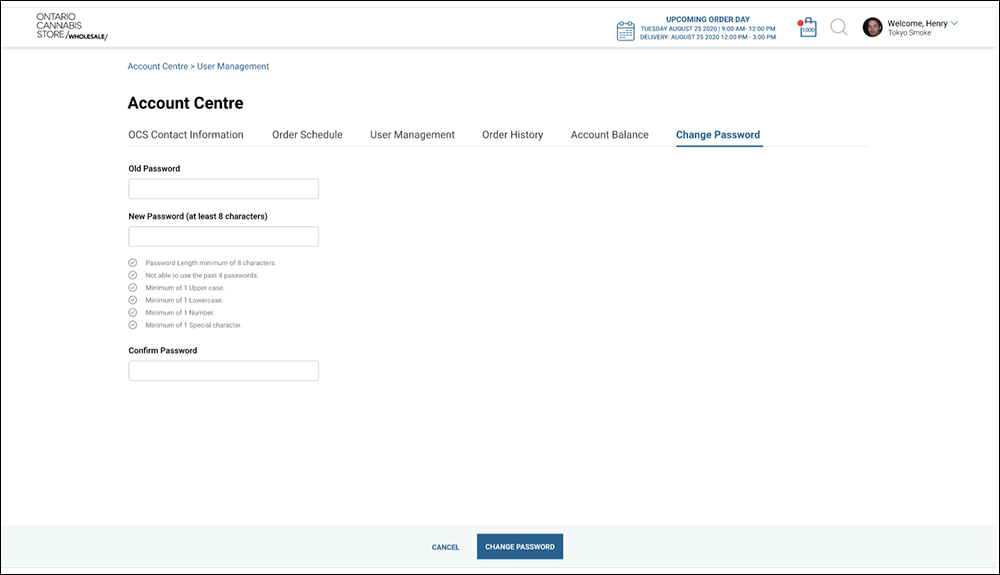
Note: Visit the Login page and select Forgot Password? to reset your password.
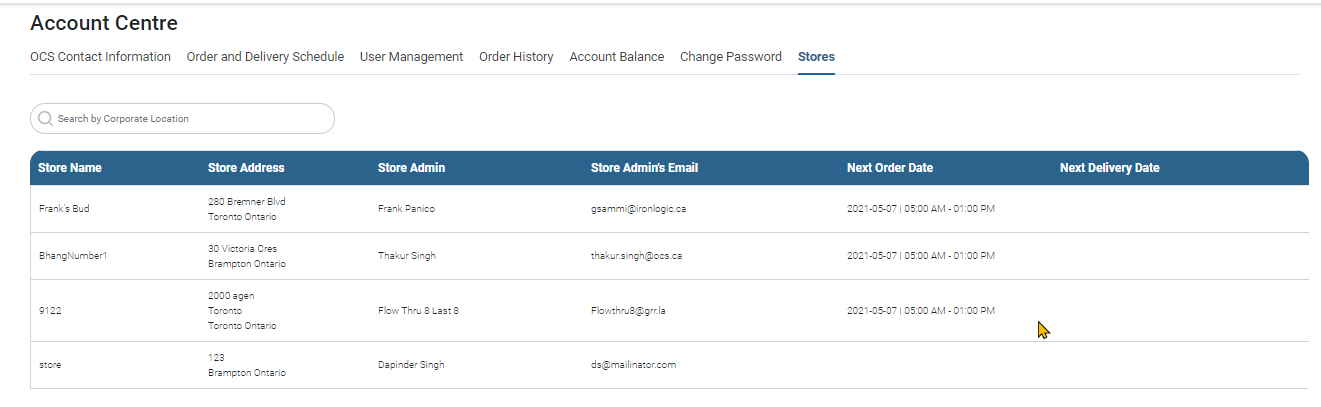
Stores
On the Stores page, you can access information about stores assigned to your OCS B2B Portal Retailer Account. From this page you can view the store name, store address, store admin name and email address, and the next Order and Delivery dates.